
Vault is a secret management tool developed by Hashicorp. It allows for secure storage and management of secrets. In this article, we will see how to use Vault to manage your application’s secrets.
Vault was released in 2015 and has become an essential tool for secret management. It is used by many companies for its flexibility and security. Its scope is wide, it can be used to store secrets, certificates, SSH keys, API tokens, etc.
Key Concepts of Vault
Before starting to use Vault, it is important to understand its key concepts to provide context for its usage.
Storage Backends
Vault uses a backend storage system to store data. There are several types of backends, each with its own advantages and disadvantages. The most common ones are:
- Consul
- Raft
- Etcd
- MySQL
- PostgreSQL
- S3
- GCS
The choice of a backend depends on your needs and infrastructure, they are not all equal in terms of performance and availability. There is only one backend per Vault cluster, but you can have multiple Vault clusters in your infrastructure.
It should be noted that Vault will not store anything in plain text, the data is encrypted before being stored in the backend.
Secrets Engines
The secrets engines are the components responsible for generating and managing secrets. They can store, generate, or encrypt data.
Some secrets engines can connect to other services to generate secrets dynamically (e.g., Database secrets engine).
There is nothing preventing having multiple secrets engines (that’s actually the idea), they are isolated from each other and can be configured independently. It is also possible to have multiple engines of the same type.
A secret engine is enabled on a path that allows it to be identified. Regardless of the type used, the same communication methods are always employed (the interpretation of the engine takes precedence).
readto read a secretwriteto write a secretdeleteto delete a secretlistto list secretspatchto modify a secret
Some secrets engines will have a different behavior for a similar method. For example, the kv secret engine with read will return the content of a secret, while the database secret engine with read will generate access to a database.
Auth Methods
An authentication method is a component that validates the identity of a user or application. Once authenticated, Vault provides an access token that validates the actions of the user or application.
For example, if I authenticate via LDAP, I will obtain an access token that will allow me to perform actions on Vault.
It is also possible to use an existing token for authentication (without going through an auth method).
Each token can have a set of policies that determine the actions the client can perform, as well as a TTL (Time To Live) that determines the token’s validity period.
Vault Path
Just like Consul’s kv system, Vault uses a path system to organize data.
The prefix of a path allows you to specify which component the request should be sent to. For example, if you send a request to auth/ldap/login, it will be forwarded to the auth component that handles LDAP authentication.
The components all have a default path that can be modified through configuration (you can even add the same component twice with different paths).
Some paths are reserved and cannot be used to store data. For example:
syscubbyholeidentityauth
Now that we have seen the key concepts of Vault, let’s see how to install and use it.
Installing a Vault Server
On Debian, it is possible to install Vault via the official Hashicorp repositories. To do this, you need to add the GPG key and the repository to the APT sources list.
wget -O- https://apt.releases.hashicorp.com/gpg | sudo gpg --dearmor -o /usr/share/keyrings/hashicorp-archive-keyring.gpg
gpg --no-default-keyring --keyring /usr/share/keyrings/hashicorp-archive-keyring.gpg --fingerprint
echo "deb [arch=$(dpkg --print-architecture) signed-by=/usr/share/keyrings/hashicorp-archive-keyring.gpg] https://apt.releases.hashicorp.com $(lsb_release -cs) main" | sudo tee /etc/apt/sources.list.d/hashicorp.list
sudo apt update && sudo apt install vault
At the end of the installation, I should be able to run the vault command to verify that it was successful.
$ vault -version
Vault v1.15.4 (9b61934559ba31150860e618cf18e816cbddc630), built 2023-12-04T17:45:28Z
I can also check if the server is running properly using the vault status command.
$ vault status
Error checking seal status: Get "https://127.0.0.1:8200/v1/sys/seal-status": dial tcp 127.0.0.1:8200: connect: connection refused
If the server is not running (which is the case here), you can run the command systemctl start vault.
Now that the server is running, I can check its status.
$ vault status
Error checking seal status: Get "https://127.0.0.1:8200/v1/sys/seal-status": tls: failed to verify certificate: x509: cannot validate certificate for 127.0.0.1 because it doesn't contain any IP SANs
This error is normal because the certificate used by Vault does not contain the server’s IP address. Therefore, you need to use the -tls-skip-verify option to ignore this error or set the VAULT_SKIP_VERIFY environment variable to true.
$ vault status
Key                Value
---                -----
Seal Type          shamir
Initialized        false
Sealed             true
Total Shares       0
Threshold          0
Unseal Progress    0/0
Unseal Nonce       n/a
Version            1.15.4
Build Date         2023-12-04T17:45:28Z
Storage Type       file
HA Enabled         false
We obtain a lot of information, but we will focus on the following:
Seal Type: The type of sealing used by Vault. There are several sealing types, but we will use theshamirtype, which is the most common.Initialized: Indicates whether the server has been initialized or not.Sealed: Indicates whether the server is sealed or not. A sealed server cannot be used.Storage Type: The type of storage used by Vault. By default, Vault uses local storage, but other types can be used.
Server Initialization
At startup, Vault is sealed and cannot be used. To unseal it, you need to provide the necessary information for it to decrypt the data it contains. For this, it uses a unique key: the root key.
To provide the root key to Vault, you need to give it 3 to 5 additional keys that will be used to reconstruct the root key. These keys are called unseal keys.
The goal is to distribute the unseal keys among multiple people to prevent a single person from being able to unseal the server.

Once the server is unsealed, it becomes usable and can finally be queried to store secrets.
But for now, our server is not initialized. We must first generate the unseal keys and the root key.
Our Vault server is accessible but not initialized. Let’s initialize it by creating the unseal keys and the root key using the vault operator init command. Two parameters are required to initialize the server:
-key-shares: Number of unseal keys to generate.-key-threshold: Number of unseal keys required to unseal the server.
Tip
If you want to share the unseal keys with 10 people, make sure to allow unlocking the server with fewer than 10 keys (for example, 6 people) to avoid being unable to work if one of the participants is on vacation.
For my installation, I will generate 5 unseal keys and set the threshold to 3.
$ vault operator init -key-shares=5 -key-threshold=3
Unseal Key 1: ctjl5Sf2MOUUAO7tLvlL1cHfzpxHHf1cbyxT7cfJfAr+
Unseal Key 2: eVK/kl9LJdyosgUiiEqWO+w5OZZBlT5zAGqAA9qGT9sD
Unseal Key 3: IgVFH1wh1wgEtlqtvnYZbTdsiHvBgt+WImTE1cDFgXCq
Unseal Key 4: 5Nvrc7gTt/VQwX7JvA5hboAivjB59/xfn9daatmsf4RH
Unseal Key 5: ulxOPPscUryTjRb0yp4dLDHAOQgGSwKhYykGTJqXrzyh

Initial Root Token: hvs.PjCYLqBpCKfxOjqHrRKXc0Eq

Vault initialized with 5 key shares and a key threshold of 3. Please securely
distribute the key shares printed above. When the Vault is re-sealed,
restarted, or stopped, you must supply at least 3 of these keys to unseal it
before it can start servicing requests.

Vault does not store the generated root key. Without at least 3 keys to
reconstruct the root key, Vault will remain permanently sealed!

It is possible to generate new unseal keys, provided you have a quorum of
existing unseal keys shares. See "vault operator rekey" for more information.
We obtain five unseal keys and the root key. It is important to store these keys in a safe place, as without them, it will be impossible to unseal the server.
$ vault status
Key                Value
---                -----
Seal Type          shamir
Initialized        true
Sealed             true
Total Shares       5
Threshold          3
Unseal Progress    0/3
...
Our server is properly initialized and sealed. To unseal it, we need to provide it with 3 unseal keys out of the 5 available. We will use the vault operator unseal command and provide it with 3 of the 5 unseal keys.
$ vault operator unseal ctjl5Sf2MOUUAO7tLvlL1cHfzpxHHf1cbyxT7cfJfAr+
Key                Value
---                -----
Seal Type          shamir
Initialized        true
Sealed             true
Total Shares       5
Threshold          3
Unseal Progress    1/3
Unseal Nonce       b93329ef-1518-f145-eefb-d4f8cf1054cc
Version            1.15.4
Build Date         2023-12-04T17:45:28Z
Storage Type       file
HA Enabled         false
$ vault operator unseal eVK/kl9LJdyosgUiiEqWO+w5OZZBlT5zAGqAA9qGT9sD > /dev/null
$ vault operator unseal IgVFH1wh1wgEtlqtvnYZbTdsiHvBgt+WImTE1cDFgXCq > /dev/null
The server is now unsealed and ready to be used. It will be automatically sealed again upon restart or if an administrator manually seals it.
$ vault status | grep Sealed
Sealed          false
And what if I want to automatically unseal the server at startup?
In this case, there is a method that allows you to define an automatic unseal key using AWS-KMS, GCP-KMS, or Azure Key Vault.
What if I am on-premise?
If you are on-premise, you can use an HSM (Hardware Security Module) to store the unseal key, this feature is available in the Enterprise version of Vault.
We will not cover these methods in this article, but I invite you to consult the official documentation for more information.
I don’t want to pay for Vault Enterprise, is there another method?
There is one last method which consists of using Transit Auto Unseal that allows us to use another Vault cluster to store the unseal key. This method is available in the Open Source version of Vault and is very simple to set up.
Now that our Vault server is initialized and unsealed, let’s see how to interact with it.
Vault Interfaces
Vault has multiple interfaces that allow interaction with the server. Let’s see the following:
- CLI
- API HTTP
- WEBUI
In practice, I will always prefer using the CLI for administrative operations and the HTTP API for applications.
Install the Vault client
To install the vault CLI utility, you can follow the same procedure as the installation on Debian, but it also installs the files for the ‘server’ part (systemd service, etc/ directory). Therefore, I prefer to install it via Nix or download the CLI directly without using a package manager.
nix-env -i vault -v
nix-shell -p vault # Temporary
or
VAULT_VERSION="1.15.4"
ARCH="amd64"
OS="linux"
wget "https://releases.hashicorp.com/vault/${VAULT_VERSION}/vault_${VAULT_VERSION}_${OS}_${ARCH}.zip" -O vault.zip
unzip vault.zip
sudo mv vault /usr/bin
Authenticate via the CLI
From our workstation, if we try to interact with the server, we get an error because the server https://127.0.0.1:8200 is unreachable (which is logical: we are on localhost).
$ vault status
Error checking seal status: Get "https://127.0.0.1:8200/v1/sys/seal-status": dial tcp 127.0.0.1:8200: connect: connection refused
You need to specify the server address to the Vault utility. To do this, we will use the VAULT_ADDR environment variable.
export VAULT_ADDR="https://vault-01.servers.une-pause-cafe.fr:8200"
export VAULT_SKIP_VERIFY=true
vault status # It should work
The same command is possible by passing arguments.
$ vault status -address="https://vault-01.servers.une-pause-cafe.fr:8200" -tls-skip-verify
Key             Value
---             -----
Seal Type       shamir
Initialized     true
Sealed          false
Total Shares    5
Threshold       3
Version         1.15.4
Build Date      2023-12-04T17:45:28Z
Storage Type    file
Cluster Name    vault-cluster-d7b71039
Cluster ID      ebb07014-7c6c-635c-f74e-c8fd103c4aea
HA Enabled      false
Now that we are connected to the server, we will authenticate ourselves. To do this, we will use the vault login command and provide it with the root token.
$ vault login
Token (will be hidden):

Success! You are now authenticated. The token information displayed below
is already stored in the token helper. You do NOT need to run "vault login"
again. Future Vault requests will automatically use this token.

Key                  Value
---                  -----
token                hvs.PjCYLqBpCKfxOjqHrRKXc0Eq
token_accessor       R9OD9o4U3uES0vc0tkyVj82U
token_duration       ∞
token_renewable      false
token_policies       ["root"]
identity_policies    []
policies             ["root"]
We are now authenticated and can start using the secret manager.
Using a valid certificate
Using a self-signed certificate is fine for a development environment, but for a production environment, it is recommended to use a valid certificate.
To mimic production, I will generate a Certificate Authority (CA) using mkcert, a program that allows generating valid certificates for development purposes.
I install mkcert on my user workstation:
nix-env -i mkcert
# ou
apt install mkcert
# ou
yum install mkcert
# ou
apk add mkcert
I generate and install the CA:
mkcert -installWe can now generate a valid certificate for our Vault server.
mkcert -cert-file vault-01.servers.une-pause-cafe.fr.crt -key-file vault-01.servers.une-pause-cafe.fr.key vault-01.servers.une-pause-cafe.frThis certificate will be valid for the domain vault-01.servers.une-pause-cafe.fr.
I start by sending the .crt and .key files to the Vault server.
scp vault-01.servers.une-pause-cafe.fr.crt vault-01.servers.une-pause-cafe.fr.key vault-01.servers.une-pause-cafe.fr:Now, we stop the service and copy the certificates to the /opt/vault/tls/ directory.
systemctl stop vault
cp vault-01.servers.une-pause-cafe.fr.crt /opt/vault/tls/tls.crt
cp vault-01.servers.une-pause-cafe.fr.key /opt/vault/tls/tls.key
systemctl start vault
By default, my configuration already uses these files, so I don’t need to make any changes. But if that’s not the case for you, you need to modify the file /etc/vault.d/vault.hcl and add the following lines:
# HTTPS listener
listener "tcp" {
  address       = "0.0.0.0:8200"
  tls_cert_file = "/opt/vault/tls/tls.crt"
  tls_key_file  = "/opt/vault/tls/tls.key"
}
I also take this opportunity to install the CA on the Vault server so that it can communicate with its own service without having to ignore TLS errors.
scp $(mkcert -CAROOT)/rootCA.pem vault-01.servers.une-pause-cafe.fr:
ssh vault-01.servers.une-pause-cafe.fr
cp rootCA.pem /usr/local/share/ca-certificates/homelab.crt
We can now update the list of certificates.
$ update-ca-certificates
Updating certificates in /etc/ssl/certs...
rehash: warning: skipping ca-certificates.crt,it does not contain exactly one certificate or CRL
1 added, 0 removed; done.
Running hooks in /etc/ca-certificates/update.d...
done.
I can now attempt a request to the Vault server without having to ignore TLS errors.
$ curl https://vault-01.servers.une-pause-cafe.fr:8200 -v -q
*   Trying 100.64.0.12:8200...
* Connected to vault-01.servers.une-pause-cafe.fr (100.64.0.12) port 8200 (#0)
* ALPN: offers h2,http/1.1
* TLSv1.3 (OUT), TLS handshake, Client hello (1):
*  CAfile: /etc/ssl/certs/ca-certificates.crt
*  CApath: /etc/ssl/certs
* TLSv1.3 (IN), TLS handshake, Server hello (2):
* TLSv1.3 (IN), TLS handshake, Encrypted Extensions (8):
* TLSv1.3 (IN), TLS handshake, Request CERT (13):
* TLSv1.3 (IN), TLS handshake, Certificate (11):
* TLSv1.3 (IN), TLS handshake, CERT verify (15):
* TLSv1.3 (IN), TLS handshake, Finished (20):
* TLSv1.3 (OUT), TLS change cipher, Change cipher spec (1):
* TLSv1.3 (OUT), TLS handshake, Certificate (11):
* TLSv1.3 (OUT), TLS handshake, Finished (20):
* SSL connection using TLSv1.3 / TLS_CHACHA20_POLY1305_SHA256
* ALPN: server accepted h2
* Server certificate:
*  subject: O=mkcert development certificate; OU=quentinj@pop-os (Quentin JOLY)
*  start date: Jan 12 07:15:47 2024 GMT
*  expire date: Apr 12 06:15:47 2026 GMT
*  subjectAltName: host "vault-01.servers.une-pause-cafe.fr" matched cert's "vault-01.servers.une-pause-cafe.fr"
*  issuer: O=mkcert development CA; OU=quentinj@pop-os (Quentin JOLY); CN=mkcert quentinj@pop-os (Quentin JOLY)
*  SSL certificate verify ok.
We can also see the certificate information in the server’s response.
Create a Vault Cluster
Now that we have a Vault server, let’s add a layer of high availability by creating a cluster. To do this, we will first configure our current node to join our group.
The first thing to do is to create a ~/migrate.hcl file that will allow us to migrate our local storage to a shared storage with the future nodes of the cluster.
storage_source "file" {
  path = "/opt/vault/data"
}

storage_destination "raft" {
  path = "/opt/vault/raft/"
  node_id = "vault_node_1"
}

cluster_addr = "https://100.64.0.12:8201" # à changer dans votre cas
Info
Raft is a distributed consensus protocol that allows data synchronization between multiple nodes. It is used by Vault to synchronize data between nodes in a cluster. We have already seen it in the article on Consul.
Raft operates in a leader-follower mode, where one node is elected as the leader and the other nodes are followers. The leader is responsible for synchronizing data between the nodes. If the leader becomes unreachable, a new leader is elected from the followers.

Warning
Attention, the /opt/vault/raft directory needs to be created manually.
This file provides details on how to migrate from local storage to shared raft storage. It also includes the cluster_addr address that will be used by other nodes to join the cluster.
$ sudo -u vault vault operator migrate -config=migrate.hcl
2024-01-12T10:37:23.927+0100 [INFO]  creating Raft: config="&raft.Config{ProtocolVersion:3, HeartbeatTimeout:5000000000, ElectionTimeout:5000000000, CommitTimeout:50000000, MaxAppendEntries:64, BatchApplyCh:true, ShutdownOnRemove:true, TrailingLogs:0x2800, SnapshotInterval:120000000000, SnapshotThreshold:0x2000, LeaderLeaseTimeout:2500000000, LocalID:\"vault_node_1\", NotifyCh:(chan<- bool)(0xc0026cb570), LogOutput:io.Writer(nil), LogLevel:\"DEBUG\", Logger:(*hclog.intLogger)(0xc002dbc1e0), NoSnapshotRestoreOnStart:true, skipStartup:false}"
2024-01-12T10:37:23.930+0100 [INFO]  initial configuration: index=1 servers="[{Suffrage:Voter ID:vault_node_1 Address:100.64.0.12:8201}]"
2024-01-12T10:37:23.930+0100 [INFO]  entering follower state: follower="Node at vault_node_1 [Follower]" leader-address= leader-id=
2024-01-12T10:37:32.910+0100 [WARN]  heartbeat timeout reached, starting election: last-leader-addr= last-leader-id=
2024-01-12T10:37:32.910+0100 [INFO]  entering candidate state: node="Node at vault_node_1 [Candidate]" term=2
2024-01-12T10:37:32.918+0100 [INFO]  election won: term=2 tally=1
2024-01-12T10:37:32.918+0100 [INFO]  entering leader state: leader="Node at vault_node_1 [Leader]"
2024-01-12T10:37:32.928+0100 [INFO]  copied key: path=core/audit
[...]
2024-01-12T10:37:32.957+0100 [INFO]  copied key: path=sys/policy/default
Success! All of the keys have been migrated.
Warning
The vault operator migrate command should be used with the vault user instead of root because it will modify the permissions of the files in the /opt/vault/raft/ directory.
If you executed it with the root user, you can fix the permissions with the following command:
chown vault:vault -R /opt/vault/raft/We can now edit the Vault configuration /etc/vault.d/vault.hcl:
ui = true

disable_mlock = true # recommandé lorsqu'on utilise Raft

storage "raft" {
  path = "/opt/vault/raft/"
  node_id = "vault_node_1"
}

cluster_addr = "https://vault-01.servers.une-pause-cafe.fr:8201"
api_addr = "https://vault-01.servers.une-pause-cafe.fr:8200"

# HTTPS listener
listener "tcp" {
  address       = "0.0.0.0:8200"
  tls_cert_file = "/opt/vault/tls/tls.crt"
  tls_key_file  = "/opt/vault/tls/tls.key"
}
After saving the configuration, we can restart the Vault service.
systemctl restart vaultNow, I will create 2 additional Vault servers and configure them to join the cluster.
Here are the server details:
| Node | IP | fqdn |
|---|---|---|
| vault-01 | 100.64.0.12 | vault-01.servers.une-pause-cafe.fr |
| vault-02 | 100.64.0.14 | vault-02.servers.une-pause-cafe.fr |
| vault-03 | 100.64.0.15 | vault-03.servers.une-pause-cafe.fr |
Creating the other machines
Certificate generation:
mkcert -cert-file vault-02.servers.une-pause-cafe.fr.crt -key-file vault-02.servers.une-pause-cafe.fr.key vault-02.servers.une-pause-cafe.fr
mkcert -cert-file vault-03.servers.une-pause-cafe.fr.crt -key-file vault-03.servers.une-pause-cafe.fr.key vault-03.servers.une-pause-cafe.fr
scp $(mkcert -CAroot)/rootCA.pem vault-02.servers.une-pause-cafe.fr.crt vault-02.servers.une-pause-cafe.fr.key vault-02.servers.une-pause-cafe.fr:
scp $(mkcert -CAroot)/rootCA.pem vault-03.servers.une-pause-cafe.fr.crt vault-03.servers.une-pause-cafe.fr.key vault-03.servers.une-pause-cafe.fr:ssh vault-02.servers.une-pause-cafe.fr
cp vault-02.servers.une-pause-cafe.fr.crt /opt/vault/tls/tls.crt
cp vault-02.servers.une-pause-cafe.fr.key /opt/vault/tls/tls.key
cp rootCA.pem /usr/local/share/ca-certificates/homelab.crt
update-ca-certificates
mkdir /opt/vault/raft
chown vault:vault -R /opt/vault/raft/ssh vault-03.servers.une-pause-cafe.fr
cp vault-03.servers.une-pause-cafe.fr.crt /opt/vault/tls/tls.crt
cp vault-03.servers.une-pause-cafe.fr.key /opt/vault/tls/tls.key
cp rootCA.pem /usr/local/share/ca-certificates/homelab.crt
update-ca-certificates
mkdir /opt/vault/raft
chown vault:vault -R /opt/vault/raft/Configuration file for the vault-02 server:
ui = true

disable_mlock = true

storage "raft" {
  path = "/opt/vault/raft/"
  node_id = "vault_node_2"
}

cluster_addr = "https://vault-02.servers.une-pause-cafe.fr:8201"
api_addr = "https://vault-02.servers.une-pause-cafe.fr:8200"
cluster_name = "vault_coffee_prod"

# HTTPS listener
listener "tcp" {
  address       = "0.0.0.0:8200"
  cluster_addr  = "0.0.0.0:8201"
  tls_cert_file = "/opt/vault/tls/tls.crt"
  tls_key_file  = "/opt/vault/tls/tls.key"
}
Configuration file for the vault-03 server:
ui = true

disable_mlock = true

storage "raft" {
  path = "/opt/vault/raft/"
  node_id = "vault_node_3"
}

cluster_addr = "https://vault-03.servers.une-pause-cafe.fr:8201"
api_addr = "https://vault-03.servers.une-pause-cafe.fr:8200"
cluster_name = "vault_coffee_prod"

# HTTPS listener
listener "tcp" {
  address       = "0.0.0.0:8200"
  cluster_addr  = "0.0.0.0:8201"
  tls_cert_file = "/opt/vault/tls/tls.crt"
  tls_key_file  = "/opt/vault/tls/tls.key"
}
I will start Vault on the other 2 servers and configure them to join the cluster.
# on vault-02.servers.une-pause-cafe.fr et vault-03.servers.une-pause-cafe.fr
systemctl start vault
And now, I will configure them to join the cluster.
# On vault-02.servers.une-pause-cafe.fr
export VAULT_ADDR="https://vault-02.servers.une-pause-cafe.fr:8200"
vault operator raft join https://vault-01.servers.une-pause-cafe.fr:8200
# On vault-03.servers.une-pause-cafe.fr
export VAULT_ADDR="https://vault-03.servers.une-pause-cafe.fr:8200"
vault operator raft join https://vault-01.servers.une-pause-cafe.fr:8200
The expected result should be:
Key       Value
---       -----
Joined    true
We need to unseal the two servers that we just added to the cluster.
# On vault-02.servers.une-pause-cafe.fr et vault-03.servers.une-pause-cafe.fr
vault operator unseal
# [...]
After unlocking the two servers, we can check the status of the cluster.
$ vault operator raft list-peers
Node            Address                                    State       Voter
----            -------                                    -----       -----
vault_node_1    100.64.0.12:8201                           leader      true
vault_node_2    vault-02.servers.une-pause-cafe.fr:8201    follower    true
vault_node_3    vault-03.servers.une-pause-cafe.fr:8201    follower    true
Yes, I don’t know why, but Vault uses the IPv4 address on the first node and the FQDN on the other nodes.
The cluster is functional and we can start using it.
Note
It should be noted that if the vault_node_1 node is unreachable, the https://vault-01.servers.une-pause-cafe.fr:8200 endpoint will also be unreachable. It is therefore recommended to use a floating IP address with keepalived to always redirect traffic to a functioning node.
Create a secret
We will finally create our first secret. For this, we will use the kv storage engine, which allows us to store data in a namespace. Like the rest of the data in Vault, the data is encrypted using AES-GCM 256-bit encryption.
There are 2 versions of the kv storage engine: kv and kv-v2. The kv-v2 version is the most recent and allows for managing secret versions, expiration dates, and structured data.
vault secrets enable -path=kv kvsecrets enableenables a storage engine.-path=kvsets the path for the storage engine.kvis the type of storage engine (kvfor Key-Value).
When creating a secret with the storage engine, we use a path to define the location of the secret. For example, if I want to store a secret in the path kv/secret/my-secret, I will use the following command:
vault kv put kv/secret/mon-secret password="Un3T4ss32Kafé"Pour récupérer le secret, je lance la commande vault kv get et lui donne le chemin du secret.
$ vault kv get kv/secret/mon-secret
====== Data ======
Key         Value
---         -----
password    Un3T4ss32Kafé
Un secret est composé d’un ensemble de clés/valeurs. Je ne possède qu’une seule clé password pour le moment, mais je pourrai en ajouter d’autres en recréant le secret suivi de la nouvelle clé/valeur à ajouter.
vault kv put kv/secret/mon-secret username="Quentin" password="Un3T4ss32Kafé"Warning
Attention, to add a key/value to an existing secret, you still need to specify the values of the existing keys. Otherwise, the secret will be overwritten and the unspecified keys will be deleted.
To view existing secrets in a path, I can use the vault kv list command and provide the path of the secret.
$ vault kv list kv/secret
Keys
----
mon-secret
The available commands are:
vault kv getto retrieve a secretvault kv putto create or update a secretvault kv listto list secretsvault kv deleteto delete a secret
Now, I want to use the kv-v2 version of the storage engine. To do this, I will create a new storage engine with the path kv2 and the type kv-v2.
vault secrets enable -path=kv2 -version=2 kvTip
You can migrate a kv storage engine to kv-v2 using the command vault kv enable-versioning
vault kv enable-versioning kv/What changes in the version 2 of the storage engine?
The v2 version is better in several ways:
- It allows for managing secret versions.
- It allows for managing secret expiration dates.
- It adds metadata to secrets.
- It adds the
patchcommand, which allows for modifying a key/value without overwriting the secret.
In kv2, we have the same commands as kv plus:
vault kv get -version=<version>to retrieve a specific version of a secret.vault destroyto permanently delete a secret.vault kv patchto modify a key/value without overwriting the secret.vault kv undeleteto restore a deleted secret.vault kv rollbackto revert to a previous version of a secret.
$ vault kv put kv2/db/dev user="app01" password="Un3T4ss32Kafé" dbname="db01"

= Secret Path =
kv2/data/db/dev

======= Metadata =======
Key                Value
---                -----
created_time       2024-01-24T19:30:10.37122978Z
custom_metadata    <nil>
deletion_time      n/a
destroyed          false
version            1
Metadata is added to the secret, showing the secret version, creation date, potential deletion date, etc.
Info
A little tip, you can use a JSON file to create a secret.
vault kv put kv2/db/dev @db.jsonNow, I will modify my secret by adding a key.
$ vault kv patch kv2/db/dev ip="192.168.1.123"
= Secret Path =
kv2/data/db/dev

======= Metadata =======
Key                Value
---                -----
created_time       2024-01-24T19:40:53.002194415Z
custom_metadata    <nil>
deletion_time      n/a
destroyed          false
version            2
So I have a version 2 of my secret. I can view previous versions using the command vault kv get -version=1 kv2/db/dev.
But if I want to revert to the previous version, I can use the vault kv rollback command, provide it with the path of the secret and the version I want to revert to.
vault kv rollback -version=1 kv2/db/devThe rollback will create a new version (3) of the secret with the content from version 1.
To delete a secret, I can do it in 2 ways:
vault kv deleteto logically delete it (data is still present, but the secret is marked as inaccessible),vault kv undeleteallows to restore it.vault destroyto permanently delete a secret (metadata is still present, but the data is deleted).
Info
Attention! In kv1, delete is permanent, but not in kv2 (which has undelete).
Metadata can be accessed using the vault kv metadata get command followed by the secret path.
$ vault kv metadata get kv2/db/dev
== Metadata Path ==
kv2/metadata/db/dev

========== Metadata ==========
Key                     Value
---                     -----
cas_required            false
created_time            2024-01-24T19:30:10.37122978Z
current_version         6
custom_metadata         <nil>
delete_version_after    0s
max_versions            0
oldest_version          0
updated_time 2024-01-24T19:40:53.002194415Zmax_versionsallows you to define the maximum number of versions for a secret.delete_version_afterallows you to define the retention period for versions of a secret.cas_requiredallows you to define whether the secret should be updated with the latest version.
Database secret engine
The database secret engine allows managing connection credentials to a database. It enables creating “roles” that generate temporary credentials for accessing a database. This ensures that the credentials are never exposed and are regenerated for each use.
Info
A role is a component of this storage engine that defines how to create ephemeral users and when to delete them.
I will create a MariaDB database in a Docker container.
version: '3.3'
services:
    database:
       image: 'mariadb:11'
       container_name: database
       restart: always
       environment:
          MYSQL_USER: user
          MYSQL_PASSWORD: mypassword
          MYSQL_DATABASE: myvaultdb
          MYSQL_ROOT_PASSWORD: rootpassword
       ports:
           - '3306:3306'
       volumes:
           - ${PWD}/mariadb/:/var/lib/mysql/
This database is accessible via the URI database.servers.une-pause-cafe.fr:3306.
To set it up in Vault, I will need to create 2 objects:
- the
database/configobject that will contain the connection information to the database, - the
database/rolesobject that will define the ways to generate the credentials.
I will go even further by creating 2 roles:
app-01-readonlywhich will allow generating credentials with read-only permissions,app-01-readwritewhich will allow generating credentials with read and write permissions.
I enable the database storage engine with the command vault secrets enable database and create the database configuration.
$ vault write database/config/db-01 \
  plugin_name=mysql-database-plugin \
  connection_url="{{username}}:{{password}}@tcp(database.servers.une-pause-cafe.fr:3306)/" \
  allowed_roles="app-01-readonly, app-01-readwrite" \
  username="root" \
  password="rootpassword"
Success! Data written to: database/config/db-01
The message Success! Data written to: database/config/db-01 indicates that the configuration has been successfully saved and that Vault was able to connect to the database (an error would have been displayed otherwise).
Warning
It is important to note that Vault will not allow you to view the database password once it has been saved. Only Vault and the database creator know the password.
Before moving on, I will connect to the database to check for existing users.
$ mysql -h database.servers.une-pause-cafe.fr -uroot -prootpassword -e "SELECT User, Host FROM mysql.user;"

+-------------+-----------+
| User        | Host      |
+-------------+-----------+
| root        | %         |
| user        | %         |
| healthcheck | 127.0.0.1 |
| healthcheck | ::1       |
| healthcheck | localhost |
| mariadb.sys | localhost |
| root        | localhost |
+-------------+-----------+
I will now create the first role app-01-readonly which will allow generating credentials with read-only permissions.
$ vault write database/roles/app-01-readonly \
    db_name=db-01 \
    creation_statements="CREATE USER '{{name}}'@'%' IDENTIFIED BY
'{{password}}';GRANT SELECT ON myvaultdb.* TO '{{name}}'@'%';" \
    default_ttl="1h" \
    max_ttl="4h"
Success! Data written to: database/roles/app-01-readonly
Now, let’s try to generate credentials with this role.
$ vault read database/creds/app-01-readonly
Key                Value
---                -----
lease_id           database/creds/app-01-readonly/3OXkaaCLTB9JWtWPCgdH18F8
lease_duration     1h
lease_renewable    true
password           LWz-KGe2-umtdH-ote4k
username           v-root-app-01-rea-8dbHBPfruwXvBW
If I display the database users, I can see that the user has been successfully created.
$ mysql -h database.servers.une-pause-cafe.fr -uroot -prootpassword -e "SELECT User, Host FROM mysql.user;"

+----------------------------------+-----------+
| User                             | Host      |
+----------------------------------+-----------+
| root                             | %         |
| user                             | %         |
| v-root-app-01-rea-8dbHBPfruwXvBW | %         |
| healthcheck                      | 127.0.0.1 |
| healthcheck                      | ::1       |
| healthcheck                      | localhost |
| mariadb.sys                      | localhost |
| root                             | localhost |
+----------------------------------+-----------+
I can now connect to the database using the generated user.
$ mysql -h database.servers.une-pause-cafe.fr -uv-root-app-01-rea-8dbHBPfruwXvBW -pLWz-KGe2-umtdH-ote4k -e "SHOW GRANTS FOR 'v-root-app-01-rea-8dbHBPfruwXvBW'@'%';"

+---------------------------------------------------------------------------------------------------------------------------------+
| Grants for v-root-app-01-rea-8dbHBPfruwXvBW@%                                                                                   |
+---------------------------------------------------------------------------------------------------------------------------------+
| GRANT USAGE ON *.* TO `v-root-app-01-rea-8dbHBPfruwXvBW`@`%` IDENTIFIED BY PASSWORD '*FFC103215DF59EEC3ED29CF52631DDEC1811171C' |
| GRANT SELECT ON `myvaultdb`.* TO `v-root-app-01-rea-8dbHBPfruwXvBW`@`%`                                                         |
+---------------------------------------------------------------------------------------------------------------------------------+
Let’s now create the role app-01-readwrite which will allow generating credentials with read and write permissions.
$ vault write database/roles/app-01-readwrite \
    db_name=db-01 \
    creation_statements="CREATE USER '{{name}}'@'%' IDENTIFIED BY
'{{password}}';GRANT SELECT, INSERT, UPDATE, DELETE ON myvaultdb.* TO '{{name}}'@'%';" \
    default_ttl="1h" \
    max_ttl="4h"
Success! Data written to: database/roles/app-01-readwrite
I generate an identifier with this role.
$ vault read database/creds/app-01-readwrite

Key                Value
---                -----
lease_id           database/creds/app-01-readwrite/Hywb4tK1qmuNxic9FARqOhfq
lease_duration     1h
lease_renewable    true
password           74kgvl7ETH-CFDKNX3cG
username           v-root-app-01-rea-Ic8E5z4s6ydBPA
I can now connect to the database using this identifier.
$ mysql -h database.servers.une-pause-cafe.fr -uv-root-app-01-rea-Ic8E5z4s6ydBPA -p74kgvl7ETH-CFDKNX3cG -e "SHOW GRANTS FOR 'v-root-app-01-rea-Ic8E5z4s6ydBPA'@'%';"

+---------------------------------------------------------------------------------------------------------------------------------+
| Grants for v-root-app-01-rea-Ic8E5z4s6ydBPA@%                                                                                   |
+---------------------------------------------------------------------------------------------------------------------------------+
| GRANT USAGE ON *.* TO `v-root-app-01-rea-Ic8E5z4s6ydBPA`@`%` IDENTIFIED BY PASSWORD '*11C9016D84F17BF80819EBCC1ABF093EAB0D4AAA' |
| GRANT SELECT, INSERT, UPDATE, DELETE ON `myvaultdb`.* TO `v-root-app-01-rea-Ic8E5z4s6ydBPA`@`%`                                 |
+---------------------------------------------------------------------------------------------------------------------------------+
Each generated credential has a TTL (Time To Live) of one hour (renewable up to four hours) and will be deleted after this period. This helps limit the exposure of credentials.
Let’s now revoke the leases of the generated credentials.
$ vault lease revoke database/creds/app-01-readonly/3OXkaaCLTB9JWtWPCgdH18F8
All revocation operations queued successfully!
$ vault lease revoke database/creds/app-01-readwrite/Hywb4tK1qmuNxic9FARqOhfq
All revocation operations queued successfully!
By revoking the leases, the generated credentials are immediately deleted from the database.
$ mysql -h database.servers.une-pause-cafe.fr -uroot -prootpassword -e "SELECT User, Host FROM mysql.user;"
+-------------+-----------+
| User        | Host      |
+-------------+-----------+
| root        | %         |
| user        | %         |
| healthcheck | 127.0.0.1 |
| healthcheck | ::1       |
| healthcheck | localhost |
| mariadb.sys | localhost |
| root        | localhost |
+-------------+-----------+
Before concluding this section on the database secret engine, there is one last thing to secure: the password of the root user of the database, known by Vault and the database administrator.
I can ask Vault to change the password of the root user using the command vault write database/rotate-root/db-01.
$ vault write -f database/rotate-root/db-01
Success! Data written to: database/rotate-root/db-01
If I try to connect to the database with the old password, I receive an error.
$ mysql -h database.servers.une-pause-cafe.fr -uroot -prootpassword -e "SELECT User, Host FROM mysql.user;"
ERROR 1045 (28000): Access denied for user 'root'@'100.64.0.13' (using password: YES)
Our root password has been successfully changed by Vault and is only known by Vault itself.
Transit secret engine
The transit storage engine allows you to integrate Vault’s data encryption/decryption into your application without having to manage encryption keys within it.
Let’s imagine a company developing multiple applications, each team having its own database and wanting to encrypt the data of each application with a different key. When the OPS manage these applications, they end up with multiple keys and different encryption types.
The idea of the transit storage engine is to centralize data encryption/decryption in Vault by acting as a micro-service receiving plaintext data and returning it encrypted (or vice versa). It is also possible for each application to use a different key, but Vault remains the actor in these operations.
⚠️ The transit storage engine does not allow data storage, it only allows data encryption/decryption and returning the result.
To use the transit storage engine, it must be enabled with the command vault secrets enable transit.
I will generate my first key that will be used for the une-tasse-de.cafe-app application. Then, I will encrypt my data with this key.
$ vault write -f transit/keys/une-tasse-de.cafe-app
$ vault write transit/encrypt/une-tasse-de.cafe-app plaintext="$(echo 'hello-world' | base64)"
Key            Value
---            -----
ciphertext     vault:v1:otgrC6o55oIX9awXC8KERLlFijBDC9cSODaeBxOjvlQ6fwP1fN6fGQ==
key_version    1
Now I have an encrypted string that I can store in my database.
If I ever want to decrypt this string, I can provide this text to the path transit/decrypt/une-tasse-de.cafe-app
$ vault write transit/decrypt/une-tasse-de.cafe-app  ciphertext="vault:v1:otgrC6o55oIX9awXC8KERLlFijBDC9cSODaeBxOjvlQ6fwP1fN6fGQ=="
Key          Value
---          -----
plaintext    aGVsbG8td29ybGQK
$ echo "aGVsbG8td29ybGQK" | base64 -d
hello-world
I can find my initial hello-world.
Tip
It is not mandatory to convert the text to base64 before sending it to Vault, but it is recommended to do so to avoid encoding issues.
If I ever want to change the encryption key, I can use the command vault write -f transit/keys/une-tasse-de.cafe-app/rotate.
$ vault write -f transit/keys/une-tasse-de.cafe-app/rotate
Key                       Value
---                       -----
allow_plaintext_backup    false
auto_rotate_period        0s
deletion_allowed          false
derived                   false
exportable                false
imported_key              false
keys                      map[1:1706550426 2:1706551374]
latest_version            2
min_available_version     0
min_decryption_version    1
min_encryption_version    0
name                      une-tasse-de.cafe-app
supports_decryption       true
supports_derivation       true
supports_encryption       true
supports_signing          false
type                      aes256-gcm96
This command will create a new key and set it as active. Data encrypted with the old key will still be decryptable by the new key, but not vice versa.
$ vault write transit/encrypt/une-tasse-de.cafe-app plaintext="$(echo 'hello-world' | base64)"
Key            Value
---            -----
ciphertext     vault:v2:FRVS0KhzJy46F4OdimD1ONJ8P5Dvn5SqLVRdqwBFZEJ3v4q+zxZjJw==
key_version    2
# I generate a new ciphertext with the new key

$ vault write transit/decrypt/une-tasse-de.cafe-app ciphertext="vault:v2:FRVS0KhzJy46F4OdimD1ONJ8P5Dvn5SqLVRdqwBFZEJ3v4q+zxZjJw=="
Key          Value
---          -----
plaintext    aGVsbG8td29ybGQK
# I can decrypt with the new key

$ vault write transit/decrypt/une-tasse-de.cafe-app ciphertext="vault:v1:otgrC6o55oIX9awXC8KERLlFijBDC9cSODaeBxOjvlQ6fwP1fN6fGQ=="
Key          Value
---          -----
plaintext    aGVsbG8td29ybGQK
# I can still decrypt with the content of the old key
Tip
Administrators, you can enforce your users to use a specific key version (for example, if version 1 is compromised, you can force the use of version 2).
In this case, developers can rewrap to generate a new version of the encrypted text using the latest available key.
vault write transit/rewrap/une-tasse-de.cafe-app ciphertext="vault:v1:otgrC6o55oIX9awXC8KERLlFijBDC9cSODaeBxOjvlQ6fwP1fN6fGQ=="
Key            Value
---            -----
ciphertext     vault:v2:dLbhwjAdiPujmwu2vf6iyiGrAJ7nULwdgJixAynbz1UOvxaxFbU3Ug==
key_version    2
Authenticating with Vault
We have been using the root token since the beginning of this article. This token has the highest permissions on Vault, and it is recommended not to use it for everyday operations.
For fine-grained management, we need to be able to authenticate different users or applications. To do this, we will first focus on user authentication in Vault.
When authenticating with Vault, it will verify that we are an authorized user. To do this, it will use an authentication mechanism/method that will verify our identity.
Once Vault trusts us, it will give us a token that allows us to perform operations. This authentication token contains information about the user and the permissions granted to them. It should be kept securely and will be used for actions on Vault.
In summary:
- The user authenticates to Vault.
- Vault verifies the user’s identity.
- Vault provides a token to the user.
- The user uses the token to perform operations on Vault.
Info
A token is always associated with a TTL (Time To Live). Once the token expires, the user must reauthenticate. It is also possible to request Vault to renew the token’s TTL (within a certain limit).
There are many authentication methods, but the most common ones are:
- Token (default)
- LDAP
- GitHub
- Kubernetes
- Kerberos
- Userpass
Tip
It is possible to see the enabled authentication mechanisms on the Vault web interface: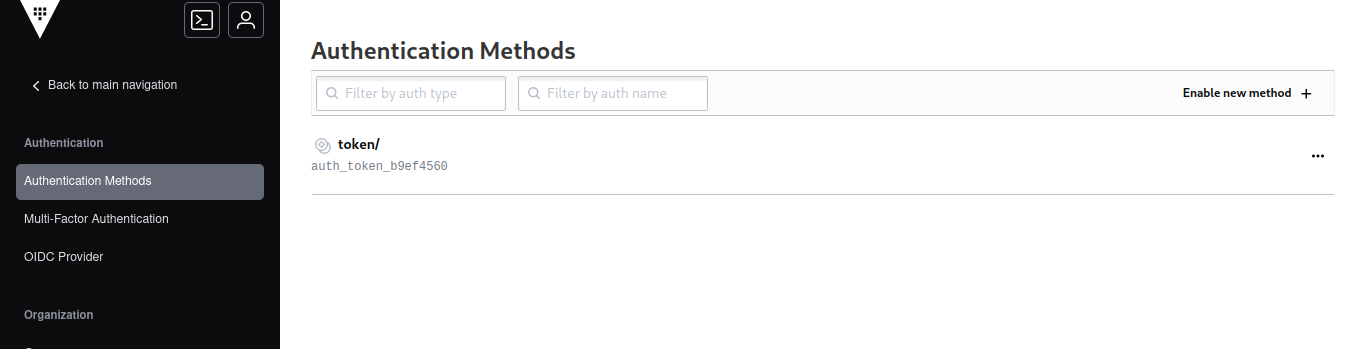
Or via the CLI:
$ vault auth list
Path      Type     Accessor               Description                Version
----      ----     --------               -----------                -------
token/    token    auth_token_b9ef4560    token based credentials    n/a
Each method is associated with a path that will allow authentication.
For example, to authenticate with a token, you must use the path token/. To authenticate with AWS, you must use the path aws/. (It is possible to choose another path, by default Vault uses the authentication mechanism’s name).
I enable the userpass authentication mechanism, which allows creating users and authenticating with a username and password.
$ vault auth enable userpass
Success! Enabled userpass auth method at: userpass/
To create a user, I can use the vault write command, provide it with the path userpass/users/<username>, and a password.
vault write auth/userpass/users/quentinj password="password"It is now possible to authenticate with the user quentinj and the password password.
I can retrieve my token using the HTTP API in the following way:
$ curl -s --request POST --data '{"password": "password"}' https://vault-01.servers.une-pause-cafe.fr:8200/v1/auth/userpass/login/quentinj | jq -r .auth.client_token
hvs.CAESIB3YP7YmYQhXQJuc0DHRtakofronBc31oxKzq-9Z3Ew8Gh4KHGh2cy5ROFlKUGxOQkF1SWIzSFV4SnJOTXFBRVc
As a second authentication method, I want to enable the github mechanism, which allows using a GitHub account as a key. This relies on an authentication token generated by GitHub with the read:org permission.
vault auth enable github
vault write auth/github/config organization=RubxKube
My GitHub account is part of the RubxKube organization, so I will be able to authenticate with my account on the WEBUI using my PAT token.
Tip
If you have installed the GitHub CLI client, you can authenticate with the token used by the tool. This token is displayed using the gh auth token command.
Then, you need to connect to the “GitHub” method and provide the ’token’ variable with the token generated by the tool.
$ vault login -method=github token="$(gh auth token)"
Success! You are now authenticated. The token information displayed below
is already stored in the token helper. You do NOT need to run "vault login"
again. Future Vault requests will automatically use this token.

Key                    Value
---                    -----
token                  hvs.CAESIG42A5ySjPoxNeCud9VKc5fhCox1fxqScV4ArJhcbE3KGh4KHGh2by5NUktMNzdBeUkyTWdpOUNEUnh1NXB0NWU
token_accessor         r7yd1ctaeJhczJz3JEGv4ES4
token_duration         768h
token_renewable        true
token_policies         ["default"]
identity_policies      []
policies               ["default"]
token_meta_org         RubxKube
token_meta_username    QJoly
In addition to using a username/password pair, it is possible to authenticate with an application token.
To do this, we can use the approle authentication mechanism, which allows us to create application tokens.
$ vault auth enable approle
$ vault write auth/approle/role/engineering policies=engineering-policy
$ vault write -f auth/approle/role/engineering/secret-id
Key                   Value
---                   -----
secret_id             9681a754-d4cd-9d8c-f9c1-a5a3b5088831
secret_id_accessor    1189f3fd-f6e1-61cb-2636-8c84a024e387
secret_id_ttl         0s
Manage Your Users (Entity and Alias)
Now that we have seen how to authenticate to Vault, let’s learn how to manage users. For this, we will use entities and aliases.
An entity is an object that represents a user or an application. It is associated with a group, policies, metadata, and aliases. On the other hand, aliases are links between an entity and an authentication mechanism.
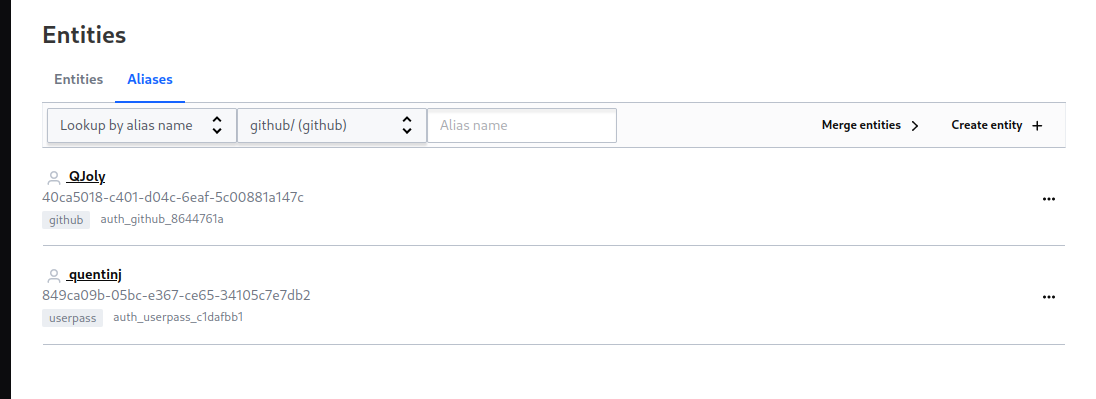
For example, I have created a user quentinj with the userpass authentication mechanism, and the user qjoly with the github authentication mechanism. As soon as I authenticated with these users, Vault created an entity and an alias for each of them.
I will associate policies (which define the permissions of the entity) to the entity. If I have multiple authentication methods for the same actor, I can link multiple aliases to an entity.
quentinj(userpass) and qjoly(github) are two different identifiers but represent the same person. So I can link them to a single entity.
Create an entity
I start by creating an entity.
Using the web interface:
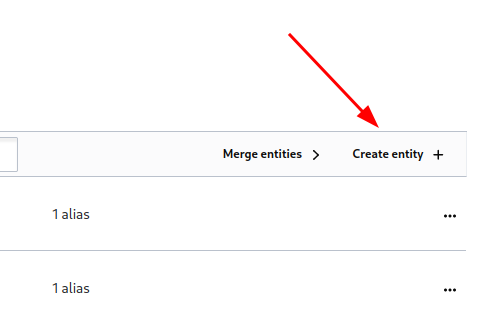
Via la CLI :
$ vault list identity/entity/name
Keys
----
entity_526e8698
entity_608ec3ec
$ vault write identity/entity name="Quentin JOLY" metadata=organization="RubxKube" metadata=team="DevOps"
$ vault list identity/entity/name
Keys
----
Quentin JOLY
entity_526e8698
entity_608ec3ec
I now have an entity named Quentin JOLY that I will link to my aliases quentinj and qjoly.
To do this, I need to go through two steps:
- Retrieve the accessor of my authentication mechanism (linked to my alias).
- Retrieve my entity_id (linked to the entity I just created).
Info
An accessor is a unique identifier for each authentication mechanism.
mount_accessor=$(vault auth list -format=json | jq '."userpass/".accessor' -r)
entity_id=$(vault read identity/entity/name/"Quentin JOLY" -format=json | jq .data.id -r)
vault write identity/entity-alias name="quentinj" canonical_id="$entity_id" mount_accessor="$mount_accessor"
To verify that the alias has been added, I can use the command vault read identity/entity/name/"Quentin JOLY" -format=json | jq .data.aliases which will return the list of aliases for the entity.
// vault read identity/entity/name/"Quentin JOLY" -format=json | jq .data.aliases
[
  {
    "canonical_id": "16dcc20e-e718-04a2-3b9a-f811b57912c9",
    "creation_time": "2024-01-14T11:20:56.920359453Z",
    "custom_metadata": null,
    "id": "55993c02-66c5-aa50-eb5d-8abaddf14ec7",
    "last_update_time": "2024-01-14T11:22:13.083223732Z",
    "local": false,
    "merged_from_canonical_ids": null,
    "metadata": null,
    "mount_accessor": "auth_userpass_c1dafbb1",
    "mount_path": "auth/userpass/",
    "mount_type": "userpass",
    "name": "quentinj"
  }
]
Same thing for the qjoly alias (authentication method github).
mount_accessor=$(vault auth list -format=json | jq '."github/".accessor' -r)
entity_id=$(vault read identity/entity/name/"Quentin JOLY" -format=json | jq .data.id -r)
vault write identity/entity-alias name="qjoly" canonical_id="$entity_id" mount_accessor="$mount_accessor"
My entity is now associated with two aliases. I can then delete the entities automatically generated by Vault. (entity_526e8698 entity_608ec3ec)
vault delete identity/entity/name/entity_526e8698
vault delete identity/entity/name/entity_608ec3ec
Managing Entity Groups
There are two types of entity groups: internal groups and external groups.
- Internal groups are used to propagate similar permissions to a set of users.
- External groups are created by Vault based on the authentication methods used.
For example, with LDAP or Active Directory, groups are automatically created by Vault and associated with directory groups.
So: we can give permissions to a group of users directly from the LDAP authentication server (we won’t discuss it here, but if you’re interested in the topic, I invite you to consult the documentation).
For internal groups, I will create a group cuistops that will include the entities Quentin JOLY, Joël SEGUILLON. A second group SRE that will include the entities Denis GERMAIN, Rémi VERCHERE, and Stéphane ROBERT. Finally, a third group gophers that will include the entities Denis GERMAIN and Rémi VERCHERE.
Je vais créer les groupes suivants:
cuistopsQuentin JOLYJoël SEGUILLON
sreDenis GERMAINRémi VERCHEREStéphane ROBERT
gophersDenis GERMAINRémi VERCHERE
Let’s work on the permissions for each group:
- The
cuistopsgroup should be able to read and write secrets in thekv2/cuistopspath, as well as read secrets in thekv2/srepath. - The
sregroup should be able to read and write secrets in thekv2/srepath. - The
gophersgroup should be able to use thetransitstorage engine and have read-write access to thegophersdatabase.
Let’s start by creating the groups.
vault write identity/group name="cuistops" policies="cuistops-policy"
vault write identity/group name="sre" policies="sre-policy"
vault write identity/group name="gophers" policies="gophers-policy"
We list the groups to verify that they have been created.
$ vault list identity/group/name
Keys
----
cuistops
gophers
sre
I also need to create the entities.
vault write identity/entity name="Joël SEGUILLON"
vault write identity/entity name="Denis GERMAIN"
vault write identity/entity name="Rémi VERCHERE"
vault write identity/entity name="Stéphane ROBERT"
I couldn’t find a method to add entities to groups from the CLI. Therefore, I have to use the more permissive HTTP API.
To do this, I will create a JSON file cuistops.json that will contain the entities of the cuistops group (Quentin JOLY and Joël SEGUILLON).
// cuistops.json
{
  "member_entity_ids": [
    "16dcc20e-e718-04a2-3b9a-f811b57912c9",
    "c6b72e53-fc29-8ec4-eaca-b526c8783319"
  ]
}
cuistops_group_id=$(vault read -format=json identity/group/name/cuistops | jq -r ".data.id")
curl \
--header "X-Vault-Token: hvs.PjCYLqBpCKfxOjqHrRKXc0Eq" \
--request POST \
--data @cuistops.json \
https://vault-01.servers.une-pause-cafe.fr:8200/v1/identity/group/id/${cuistops_group_id}I will do the same for the sre and gophers groups.
The cuistops-policy, sre-policy, and gophers-policy policies do not exist yet, so I will create them.
Create a policy
Policies are objects that define the permissions granted to an entity or a group of entities. They are used to define the permissions granted to a user or an application.
To define a policy, we can use configuration files in HCL or JSON format. I prefer using the HCL format as it is more readable.
Key points:
- By default, not having a policy is equivalent to a deny all.
- It is possible to combine multiple policies on a token.
- The act of ’listing’ is a permission on the metadata of a path.
There are 2 policies created by default: default and root. The root policy is associated with the root token and grants all permissions on Vault, while the default policy is associated with all tokens and grants basic permissions on Vault (it can be modified but not deleted).
Tip
To view the permissions granted by a policy, we can use the command vault policy read default
# Allow tokens to look up their own properties
path "auth/token/lookup-self" {
    capabilities = ["read"]
}

# Allow tokens to renew themselves
path "auth/token/renew-self" {
    capabilities = ["update"]
}

[...]
In summary, the default permissions are:
- Read the properties of its own token.
- Renew the TTL of its own token.
I will then create the following policies:
cuistops-policywhich will allow reading and writing secrets from the pathkv2/cuistopsas well as reading secrets from the pathkv2/sre.sre-policywhich will allow reading and writing secrets from the pathkv2/sre.gophers-policywhich will allow using thetransitstorage engine and thegophersdatabase in read-write mode.
cuistops-policy.hcl:
path "kv2/data/cuistops/*" {
  capabilities = ["create", "read", "update", "delete"]
}

path "kv2/metadata/cuistops/" {
  capabilities = ["list"]
}

path "kv2/data/sre/*" {
  capabilities = ["read"]
}

path "kv2/metadata/sre/" {
  capabilities = ["list"]
}sre-policy.hcl:
path "kv2/data/sre/*" {
  capabilities = ["create", "read", "update", "delete"]
}

path "kv2/metadata/sre/" {
  capabilities = ["list"]
}gophers-policy.hcl:
path "database/creds/gophers/*" {
  capabilities = ["read"]
}

path "transit/encrypt/gophers/*" {
  capabilities = ["create", "read", "update", "delete"]
}

path "transit/decrypt/gophers/*" {
  capabilities = ["create", "read", "update", "delete"]
}
I am now applying these policies.
vault policy write cuistops-policy cuistops-policy.hcl
vault policy write sre-policy sre-policy.hcl
vault policy write gophers-policy gophers-policy.hcl
The policies are created and already associated with the correct groups (since I specified them when creating the groups).
Test permissions
Next, I will test the permissions granted by the policies. Starting by authenticating as Quentin JOLY and trying to read and write secrets in the path kv2/cuistops and kv2/sre.
$ vault login -method=userpass username="quentinj" password="password"

Success! You are now authenticated. The token information displayed below
is already stored in the token helper. You do NOT need to run "vault login"
again. Future Vault requests will automatically use this token.

Key                    Value
---                    -----
token                  hvs.CAESIEgs5KsUISf1joUtQua8KMrvOz9C3YWXy-6FIFxRtf3cGh4KHGh2cy5DTncyTFkzZjNzZlJUc2x5STEza0NTMm4
token_accessor         L9kHlxrAj0i63MiIlFauhkbL
token_duration         768h
token_renewable        true
token_policies         ["default"]
identity_policies      ["cuistops-policy" "default" "gophers-policy"]
policies               ["cuistops-policy" "default" "gophers-policy"]
token_meta_username    quentinj
Then I try to read and write secrets in the path kv2/cuistops and kv2/sre.
$ vault kv put kv2/cuistops/twitch_channel name="cuistops" description="On sait pas cuire des pâtes, mais on sait faire de l'informatique"I can read and write secrets in the path kv2/cuistops but I can only read the secrets from the path kv2/sre.
$ vault kv get -format=json kv2/sre/gitlab-prod-01 | jq -r ".data.data.org"
bgthree-project
If I try to create a secret in the path kv2/sre, I receive an error.
$ vault kv put kv2/sre/kubeconfig-prod-01 data="$(base64 < ~/.kube/config )"
Error writing data to kv2/data/sre/kubeconfig-prod-01: Error making API request.

URL: PUT https://vault-01.servers.une-pause-cafe.fr:8200/v1/kv2/data/sre/kubeconfig-prod-01
Code: 403. Errors:

* 1 error occurred:
        * permission denied
Now, I will authenticate as Denis GERMAIN and try to read and write secrets in the path kv2/sre.
$ vault login -method=userpass username="dgermain" password="chaoticgood"
$ vault kv put kv2/sre/kubeconfig-prod-01 data="$(base64 < ~/.kube/config )"
========= Secret Path =========
kv2/data/sre/kubeconfig-prod-01

======= Metadata =======
Key                Value
---                -----
created_time       2024-02-02T17:56:47.19235595Z
custom_metadata    <nil>
deletion_time      n/a
destroyed          false
version            1
Denis should also be able to access the gophers database.
// vault read -format=json database/creds/gophers
{
  "request_id": "ddc04383-fe04-43a2-6661-aa1b04e57f31",
  "lease_id": "database/creds/gophers/jD4TGhM2WNQYojPN6e57bEVX",
  "lease_duration": 3600,
  "renewable": true,
  "data": {
    "password": "Y6p0Frd7Kjmsoo5JMTI-",
    "username": "v-userpass-d-gophers-lK8HGEpt"
  },
  "warnings": null
}
He can also use the transit storage engine to encrypt data.
$ vault write transit/encrypt/gophers plaintext="$(echo "hello-world" | base64)"
Key            Value
---            -----
ciphertext     vault:v1:J6Q4fH0STG3ZexKXagllrwvywhOA/wWo3+w0YThAhh+IZJDUIJlzUQ==
key_version    1
Each actor has the permissions that are granted to them (and only those).
If (let’s say), Rémi VERCHERE wants to sabotage CuistOps’ work because he was not convinced by the Kubevirt propaganda, he will have no power outside of his gophers and sre groups.
$ vault login -method=userpass username="rverchere" password="cloudsavior"
$ vault kv delete kv2/cuistops/twitch_channel
Error deleting kv2/data/cuistops/twitch_channel: Error making API request.

URL: DELETE https://vault-01.servers.une-pause-cafe.fr:8200/v1/kv2/data/cuistops/twitch_channel
Code: 403. Errors:
* 1 error occurred:
        * permission denied
Audit Devices
It is possible to set up an audit device to record the actions performed by users and applications. This allows tracking of modifications made to secrets. The device will create JSON files containing the actions and responses from the server. Sensitive information is encrypted before being stored.
vault audit enable file file_path=/var/log/vault_audit.logIt is possible to use a syslog agent to send logs to a remote server or a log collection agent like Fluentd, Logstash, or Loki.
This way, I can see Rémi’s attack on CuistOps’ secrets.
{
  "time": "2024-02-03T08:04:35.367089471Z",
  "type": "response",
  "auth": {
    "client_token": "hmac-sha256:9195377f74e705992be845acf07dd622bb255185dc3dcd84c3be24d1e138aa5d",
    "accessor": "hmac-sha256:111fef38c3b949f2a5a649c74c6cf3f0ee1e08b9c90243fe8f8ccd96dbbadcb7",
    "display_name": "userpass-rverchere",
    "policies": [
      "default",
      "gophers-policy",
      "sre-policy"
    ],
    "token_policies": [
      "default"
    ],
    "identity_policies": [
      "gophers-policy",
      "sre-policy"
    ],
    "policy_results": {
      "allowed": false
    },
    "metadata": {
      "username": "rverchere"
    },
    "entity_id": "bf4db72e-fba7-d210-9a1e-b8348c112dd9",
    "token_type": "service",
    "token_ttl": 2764800,
    "token_issue_time": "2024-02-03T09:03:27+01:00"
  },
  "request": {
    "id": "98473b8c-5d05-b986-827d-46eca65fd3e4",
    "client_id": "bf4db72e-fba7-d210-9a1e-b8348c112dd9",
    "operation": "delete",
    "mount_point": "kv2/",
    "mount_type": "kv",
    "mount_running_version": "v0.16.1+builtin",
    "mount_class": "secret",
    "client_token": "hmac-sha256:64eee3b469b8e06d370be7fedf94a8c43797dcf15b59ff125d5a1239b8f423b2",
    "client_token_accessor": "hmac-sha256:111fef38c3b949f2a5a649c74c6cf3f0ee1e08b9c90243fe8f8ccd96dbbadcb7",
    "namespace": {
      "id": "root"
    },
    "path": "kv2/data/cuistops/twitch_channel",
    "remote_address": "100.64.0.1",
    "remote_port": 35682
  },
  "response": {
    "mount_point": "kv2/",
    "mount_type": "kv",
    "mount_running_plugin_version": "v0.16.1+builtin",
    "mount_class": "secret",
    "data": {
      "error": "hmac-sha256:746cc2a128105b981aa2198c8c67090bb1b20d5c150d4d253894ae895e893f47"
    }
  },
  "error": "1 error occurred:\n\t* permission denied\n\n"
}
I can therefore trace who did what, when, and from which IP address!
Conclusion
After this long article, I still feel like I’ve only scratched the surface.
Indeed, I have been using the kv feature of Vault for several years, but I had never taken the time to explore the other peculiarities of Vault.
[ 20% OFF ] Kubernetes Certification Coupon (CKAD , CKA , CKS)
Save 20% on all the Linux Foundation training and certification programs. This is a limited-time offer for this month. This offer is applicable for CKA, CKAD, CKS, KCNA, LFCS, PCA FINOPS, NodeJS, CHFA, and all the other certification, training, and BootCamp programs.
Coupon: use code TECK20 at checkout
Hurry Up: Offer Ends Soon.
Coupon: use code TECK20 at checkout
Hurry Up: Offer Ends Soon.
- Upon registration, you have ONE YEAR to schedule and complete the exam.
- The CKAD / CKA / CKS exam is conducted online and remotely proctored.
- You are allowed a maximum of 2 attempts to take the test. However, if you miss a scheduled exam for any reason, your second attempt will be invalidated.
- Free access to killer.sh for the CK(AD)/S practice exam.
Check our last updated Kubernetes Exam Guides (CKAD , CKA , CKS) :