In this blog post, I have covered the step-by-step guide to setting up a kubernetes cluster using Kubeadm with one master and two worker node.
Kubeadm is an excellent tool to set up a working kubernetes cluster in less time. It does all the heavy lifting in terms of setting up all kubernetes cluster components. Also, It follows all the configuration best practices for a kubernetes cluster.
What is Kubeadm?

Kubeadm serves as a tool for establishing a basic Kubernetes cluster with minimal configuration complexity. Additionally, it simplifies the entire process by conducting preliminary checks to ensure that the server possesses all necessary components and configurations for Kubernetes operation.
It is created and maintained by the official Kubernetes community. Alternatives such as minikube and kind offer straightforward setups and are suitable choices with modest hardware requirements for deploying and testing applications on Kubernetes.
However, if one wishes to experiment with cluster components or evaluate administrative utilities integral to cluster management, Kubeadm stands out as the optimal choice. Furthermore, it allows the creation of a production-like cluster locally on a workstation, facilitating development and testing endeavors.
Hardware:
- Cluster Nodes: Minimum 2 Ubuntu machines. One designated as the master and the others as worker nodes. Additional worker nodes can be added for scalability.
- Master Node Resources: Minimum 2 vCPU (cores) and 2GB RAM.
- Worker Node Resources: Minimum 1 vCPU and 2GB RAM (more cores and RAM recommended for production workloads).
Networking:
- Network Range: 10.X.X.X/X static IP addresses for both master and worker nodes.
- Pod Network: Separate network range (e.g., 192.x.x.x) used by the Calico network plugin for container communication. Ensure no overlap between node and pod IP ranges.
Additional Considerations:
- Proxy Environment: If setting up behind a corporate proxy, configure necessary proxy variables and ensure access to container registries (e.g., Docker Hub).
- Image Pulling: Alternatively, whitelist
registry.k8s.iowith your network administrator to allow pulling required Kubernetes images.
Notes:
- This configuration represents a basic deployment. Production environments typically require high availability considerations and additional configuration for security and scalability.
- Expertise in Linux administration, containerization (Docker), and networking concepts is assumed.
Advanced users might also consider:
- High Availability (HA): Implementing redundant master nodes for fault tolerance.
- Storage Provisioning: Configuring persistent storage for applications using Persistent Volumes (PVs) and Persistent Volume Claims (PVCs).
- Network Security: Implementing network policies and RBAC for access control within the cluster.
Kubeadm for Kubernetes Certification Exams
Leveraging Kubeadm for Exam Preparation:
- CKA and CKS Focus: Kubeadm plays a significant role in both the Certified Kubernetes Administrator (CKA) and Certified Kubernetes Security Specialist (CKS) exams.
- CKA: Expect tasks involving cluster bootstrapping using kubeadm commands.
- CKS: Cluster upgrades using kubeadm will be part of the exam.
Practice Environment:
- Local Kubeadm Clusters: Ideal for simulating real-world scenarios and practicing exam objectives.
- Vagrant-based VMs: Efficient way to create and destroy temporary clusters on your local machine.
Benefits of Local Clusters:
- Experimentation: Provides a platform to explore various cluster configurations and gain hands-on experience.
- Troubleshooting: Enables practice in identifying and resolving issues within the cluster components.
Exam Tips:
- Utilize Coupon Codes: Take advantage of available discounts (not mentioned directly) for CKA/CKAD/CKS certifications before potential price hikes.
Note: This explanation omits the promotional aspect and focuses solely on the technical advantages of using Kubeadm for exam preparation. It emphasizes the specific exam requirements and how Kubeadm can be used effectively for practicing relevant skills.
Kubeadm Port Requirements
Kindly consult the provided image and verify that all ports necessary for the control plane (master) and worker nodes are allowed. When configuring kubeadm cluster on cloud servers, ensure firewall settings permit the required ports.

Kubernetes Cluster Setup Using Kubeadm
Following are the high-level steps involved in setting up a kubeadm-based Kubernetes cluster.
- Install container runtime on all nodes- We will be using cri-o.
- Install Kubeadm, Kubelet, and kubectl on all the nodes.
- Initiate Kubeadm control plane configuration on the master node.
- Save the node join command with the token.
- Install the Calico network plugin (operator).
- Join the worker node to the master node (control plane) using the join command.
- Validate all cluster components and nodes.
All the steps given in this guide are referred from the official Kubernetes documentation and related GitHub project pages.
Now let’s get started with the setup.
Enable iptables Bridged Traffic on all the Nodes
Execute the following commands on all the nodes for IPtables to see bridged traffic. Here we are tweaking some kernel parameters and setting them using sysctl.
cat <<EOF | sudo tee /etc/modules-load.d/k8s.conf
overlay
br_netfilter
EOF

sudo modprobe overlay
sudo modprobe br_netfilter

# sysctl params required by setup, params persist across reboots
cat <<EOF | sudo tee /etc/sysctl.d/k8s.conf
net.bridge.bridge-nf-call-iptables  = 1
net.bridge.bridge-nf-call-ip6tables = 1
net.ipv4.ip_forward                 = 1
EOF

# Apply sysctl params without reboot
sudo sysctl --system
Disable swap on all the Nodes
For kubeadm to work properly, you need to disable swap on all the nodes using the following command.
sudo swapoff -a
(crontab -l 2>/dev/null; echo "@reboot /sbin/swapoff -a") | crontab - || true
The fstab entry will make sure the swap is off on system reboots.
You can also, control swap errors using the kubeadm parameter --ignore-preflight-errors Swap we will look at it in the latter part.
Note: From 1.28 kubeadm has beta support for using swap with kubeadm clusters. Read this to understand more.
Install CRI-O Runtime On All The Nodes
Note: We are using cri-o instead if containerd because, in Kubernetes certification exams, cri-o is used as the container runtime in the exam clusters.
The basic requirement for a Kubernetes cluster is a container runtime. You can have any one of the following container runtimes.
We will be using CRI-O instead of Docker for this setup as Kubernetes deprecated Docker engine
As a first step, we need to install cri-o on all the nodes. Execute the following commands on all the nodes.
Enable cri-o repositories for version 1.28
OS="xUbuntu_22.04"

VERSION="1.28"

cat <<EOF | sudo tee /etc/apt/sources.list.d/devel:kubic:libcontainers:stable.list
deb https://download.opensuse.org/repositories/devel:/kubic:/libcontainers:/stable/$OS/ /
EOF
cat <<EOF | sudo tee /etc/apt/sources.list.d/devel:kubic:libcontainers:stable:cri-o:$VERSION.list
deb http://download.opensuse.org/repositories/devel:/kubic:/libcontainers:/stable:/cri-o:/$VERSION/$OS/ /
EOF
Add the GPG keys for CRI-O to the system’s list of trusted keys.
curl -L https://download.opensuse.org/repositories/devel:kubic:libcontainers:stable:cri-o:$VERSION/$OS/Release.key | sudo apt-key --keyring /etc/apt/trusted.gpg.d/libcontainers.gpg add -
curl -L https://download.opensuse.org/repositories/devel:/kubic:/libcontainers:/stable/$OS/Release.key | sudo apt-key --keyring /etc/apt/trusted.gpg.d/libcontainers.gpg add -
Update and install crio and crio-tools.
sudo apt-get update
sudo apt-get install cri-o cri-o-runc cri-tools -y
Reload the systemd configurations and enable cri-o.
sudo systemctl daemon-reload
sudo systemctl enable crio --now
The cri-tools contain crictl, a CLI utility to interact with the containers created by the container runtime. When you use container runtimes other than Docker, you can use the crictl utility to debug containers on the nodes. Also, it is useful in CKS certification where you need to debug containers.
Install Kubeadm & Kubelet & Kubectl on all Nodes
Install the required dependencies.
sudo apt-get update
sudo apt-get install -y apt-transport-https ca-certificates curl
Download the GPG key for the Kubernetes APT repository.
sudo curl -fsSLo /usr/share/keyrings/kubernetes-archive-keyring.gpg https://dl.k8s.io/apt/doc/apt-key.gpgAdd the Kubernetes APT repository to your system.
echo "deb [signed-by=/usr/share/keyrings/kubernetes-archive-keyring.gpg] https://apt.kubernetes.io/ kubernetes-xenial main" | sudo tee /etc/apt/sources.list.d/kubernetes.listUpdate apt repo
sudo apt-get update -yNote: If you are preparing for Kubernetes certification, install the specific version of kubernetes. For example, the current Kubernetes version for CKA, CKAD and CKS exams is kubernetes version 1.28
You can use the following commands to find the latest versions.
sudo apt update
apt-cache madison kubeadm | tac
Specify the version as shown below.
sudo apt-get install -y kubelet=1.28.2-00 kubectl=1.28.2-00 kubeadm=1.28.2-00Or, to install the latest version from the repo use the following command without specifying any version.
sudo apt-get install -y kubelet kubeadm kubectlAdd hold to the packages to prevent upgrades.
sudo apt-mark hold kubelet kubeadm kubectlNow we have all the required utilities and tools for configuring Kubernetes components using kubeadm.
Add the node IP to KUBELET_EXTRA_ARGS.
sudo apt-get install -y jq
local_ip="$(ip --json a s | jq -r '.[] | if .ifname == "eth1" then .addr_info[] | if .family == "inet" then .local else empty end else empty end')"
cat > /etc/default/kubelet << EOF
KUBELET_EXTRA_ARGS=--node-ip=$local_ip
EOF
Initialize Kubeadm On Master Node To Setup Control Plane
Here you need to consider two options.
- Master Node with Private IP: If you have nodes with only private IP addresses the API server would be accessed over the private IP of the master node.
- Master Node With Public IP: If you are setting up a Kubeadm cluster on Cloud platforms and you need master Api server access over the Public IP of the master node server.
If you are using a Private IP for the master Node,
Set the following environment variables. Replace 10.0.0.10 with the IP of your master node.
IPADDR="10.0.0.10"
NODENAME=$(hostname -s)
POD_CIDR="192.168.0.0/16"
If you want to use the Public IP of the master node,
Set the following environment variables. The IPADDR variable will be automatically set to the server’s public IP using ifconfig.me curl call. You can also replace it with a public IP address
IPADDR=$(curl ifconfig.me && echo "")
NODENAME=$(hostname -s)
POD_CIDR="192.168.0.0/16"
Now, initialize the master node control plane configurations using the kubeadm command.
For a Private IP address-based setup use the following init command.
sudo kubeadm init --apiserver-advertise-address=$IPADDR --apiserver-cert-extra-sans=$IPADDR --pod-network-cidr=$POD_CIDR --node-name $NODENAME --ignore-preflight-errors Swap
--ignore-preflight-errors Swap is actually not required as we disabled the swap initially.
For Public IP address-based setup use the following init command.
Here instead of --apiserver-advertise-address we use --control-plane-endpoint parameter for the API server endpoint.
sudo kubeadm init --control-plane-endpoint=$IPADDR --apiserver-cert-extra-sans=$IPADDR --pod-network-cidr=$POD_CIDR --node-name $NODENAME --ignore-preflight-errors SwapAll the other steps are the same as configuring the master node with private IP.
Note: You can also pass the kubeadm configs as a file when initializing the cluster. See Kubeadm Init with config file
On a successful kubeadm initialization, you should get an output with kubeconfig file location and the join command with the token as shown below. Copy that and save it to the file. we will need it for joining the worker node to the master.
Use the following commands from the output to create the kubeconfig in master so that you can use kubectl to interact with cluster API.
mkdir -p $HOME/.kube
sudo cp -i /etc/kubernetes/admin.conf $HOME/.kube/config
sudo chown $(id -u):$(id -g) $HOME/.kube/config
Now, verify the kubeconfig by executing the following kubectl command to list all the pods in the kube-system namespace.
kubectl get po -n kube-systemYou should see the following output. You will see the two Coredns pods in a pending state. It is the expected behavior. Once we install the network plugin, it will be in a running state
You verify all the cluster component health statuses using the following command.
kubectl get --raw='/readyz?verbose'You can get the cluster info using the following command.
kubectl cluster-info By default, apps won’t get scheduled on the master node. If you want to use the master node for scheduling apps, taint the master node.
kubectl taint nodes --all node-role.kubernetes.io/control-plane-Install Calico Network Plugin for Pod Networking
Kubeadm does not configure any network plugin. You need to install a network plugin of your choice for kubernetes pod networking and enable network policy.
I am using the Calico network plugin for this setup.
Note: Make sure you execute the kubectl command from where you have configured the
kubeconfigfile. Either from the master of your workstation with the connectivity to the kubernetes API.
Execute the following commands to install the Calico network plugin operator on the cluster.
kubectl create -f https://raw.githubusercontent.com/projectcalico/calico/v3.26.1/manifests/tigera-operator.yaml

curl https://raw.githubusercontent.com/projectcalico/calico/v3.26.1/manifests/custom-resources.yaml -O

kubectl create -f custom-resources.yaml
After a couple of minutes, if you check the pods in kube-system namespace, you will see calico pods and running CoreDNS pods.
Join Worker Nodes To Kubernetes Master Node
We have set up cri-o, kubelet, and kubeadm utilities on the worker nodes as well.
Now, let’s join the worker node to the master node using the Kubeadm join command you have got in the output while setting up the master node.
If you missed copying the join command, execute the following command in the master node to recreate the token with the join command.
kubeadm token create --print-join-commandHere is what the command looks like. Use sudo if you running as a normal user. This command performs the TLS bootstrapping for the nodes.
sudo kubeadm join 10.128.0.37:6443 --token j4eice.33vgvgyf5cxw4u8i \
    --discovery-token-ca-cert-hash sha256:37f94469b58bcc8f26a4aa44441fb17196a585b37288f85e22475b00c36f1c61
On successful execution, you will see the output saying, “This node has joined the cluster”.
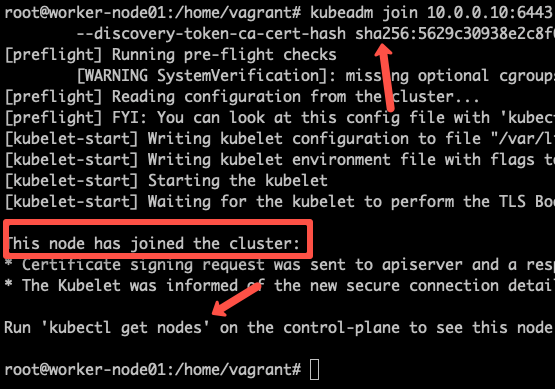
Now execute the kubectl command from the master node to check if the node is added to the master.
kubectl get nodesExample output,
root@master-node:/home/vagrant# kubectl get nodes
NAME            STATUS   ROLES           AGE     VERSION
controlplane     Ready    control-plane   14m     v1.28.2
node01           Ready    <none>          2m13s   v1.28.2
node02           Ready    <none>          2m5s    v1.28.2
In the above command, the ROLE is <none> for the worker nodes. You can add a label to the worker node using the following command. Replace worker-node01 with the hostname of the worker node you want to label.
kubectl label node worker-node01 node-role.kubernetes.io/worker=workerYou can further add more nodes with the same join command.
Deploy A Sample Nginx Application
Now that we have all the components to make the cluster and applications work, let’s deploy a sample Nginx application and see if we can access it over a NodePort
Create an Nginx deployment. Execute the following directly on the command line. It deploys the pod in the default namespace.
cat <<EOF | kubectl apply -f -
apiVersion: apps/v1
kind: Deployment
metadata:
  name: nginx-deployment
spec:
  selector:
    matchLabels:
      app: nginx
  replicas: 2
  template:
    metadata:
      labels:
        app: nginx
    spec:
      containers:
      - name: nginx
        image: nginx:latest
        ports:
        - containerPort: 80
EOF
Expose the Nginx deployment on a NodePort 32000
cat <<EOF | kubectl apply -f -
apiVersion: v1
kind: Service
metadata:
  name: nginx-service
spec:
  selector:
    app: nginx
  type: NodePort
  ports:
    - port: 80
      targetPort: 80
      nodePort: 32000
EOF
Check the pod status using the following command.
kubectl get podsOnce the deployment is up, you should be able to access the Nginx home page on the allocated NodePort.
For example :

Potential Kubeadm Cluster Issues
- Insufficient Master Resources: A common issue arises when the master node lacks sufficient CPU (minimum 2vCPU) or memory (minimum 2GB) to handle cluster operations. This can manifest as pod resource exhaustion and negatively impact cluster stability.
- Network Connectivity Issues: In cases where firewalls block communication between nodes, pods might not be able to reach the API server or other services on the master node. Verifying open firewall rules on required Kubernetes ports across all nodes is crucial for ensuring proper communication.
- Calico Network Plugin Conflicts: Overlapping IP address ranges between the node network and pod network (managed by Calico) can cause unexpected behavior and pod restarts. Assigning distinct IP ranges for nodes and pods is essential for maintaining a functional network configuration within the cluster.
How Does Kubeadm Work?
- Kubeadm meticulously validates the system state through pre-flight checks, ensuring the environment meets the minimum requirements for running a Kubernetes cluster.
- Subsequently, it fetches all the essential container images required for the cluster from the official registry (
registry.k8s.io).
2. TLS Certificate Generation:
- Kubeadm generates a robust set of TLS certificates to secure communication within the cluster. These certificates are securely stored within the
/etc/kubernetes/pkidirectory.
3. Kubeconfig File Generation:
- Kubeadm creates configuration files (kubeconfig) for each cluster component, granting them the necessary permissions to interact with the API server. These files are placed in the
/etc/kubernetesdirectory for easy access.
4. Kubelet Service and Pod Manifests:
- Kubeadm initiates the
kubeletservice, a crucial component responsible for managing pods on each node. - It then statically generates pod manifests defining the configurations for all control plane components. These manifests are stored in the
/etc/kubernetes/manifestsdirectory.
5. Control Plane Deployment:
- Leveraging the previously generated pod manifests, Kubeadm initiates the control plane components, establishing the core functionalities of the Kubernetes cluster.
6. Core DNS and Kube-proxy Integration:
- Kubeadm seamlessly integrates essential services like CoreDNS (cluster DNS) and Kube-proxy (load balancer) into the cluster, ensuring efficient service discovery and network communication.
7. Node Bootstrap Token Generation:
- Finally, Kubeadm generates a unique node bootstrap token. This token serves as a secure credential for worker nodes to join the established control plane.
Kubeadm FAQs
By default, Kubeadm generates its own set of TLS certificates. However, you can incorporate your own certificates by placing them within the designated directory: /etc/kubernetes/pki. Kubeadm will prioritize existing certificates found in this location and refrain from overwriting them during the initialization process.
Conclusion
In this article, we explored the step-by-step process of installing Kubernetes using kubeadm.
For DevOps engineers, grasping the fundamental components of a Kubernetes cluster is essential. While managed Kubernetes services are widely adopted by companies, they may overlook the foundational knowledge of Kubernetes.
Setting up Kubernetes with Kubeadm is an excellent method for hands-on learning and experimentation.
Furthermore, there exist numerous Kubeadm configurations beyond the scope of this guide. For detailed information, please consult the official Kubeadm documentation. Setting up the entire cluster within virtual machines enables comprehensive learning of cluster components’ configurations and troubleshooting in case of component failures