What is GitOps?
GitOps is a methodology where Git will be at the center of the delivery automation processes. It acts as a “source of truth” and will be coupled with programs to continually compare the current infrastructure with that described in the Git repository.
It should not be confused with CI-CD, which consists of testing the application code and delivering it. Indeed, GitOps uses the same process but includes other aspects of the application architecture:
- Infrastructure as code.
- Policy as code.
- Configuration as code.
- And many more X-as-Code elements.
Infrastructure Management
Example :
I want to make it easier to administer my AWS infrastructure. I can set up accounts for my ten team members to edit and create EC2 instances and security groups.
This operation is a simple and easy-to-use methodology but there are still some gray areas:
- How do I know who modified this EC2 instance and why?
- How to reproduce the exact same infrastructure to create dev / staging environments ?
- How can I be sure that the infrastructure configuration is the latest up-to-date?
- For testing or debugging purposes, how do I revert to a previous version of the configuration?
To address these issues, it is common to use infrastructure management and/or configuration management software such as Ansible or Terraform and to limit manual modifications.
But these software programs don’t do everything. Once the configuration is written, someone needs to apply it every time it is updated. Then new questions arise:
- Who should run the scripts? When? How?
- How to keep track of deployments?
- How can I be sure that the configuration launched is the latest one?
- How to test this configuration before deploying it?
Most questions can be answered quite easily by coupling these software with CI-CD tools (Jenkins, Gitlab CI, Github Actions, etc.). We then find ourselves coupling the world of development with that of IS administration.
And that’s exactly what GitOps is: a methodology that will allow Git to be used to manage the infrastructure using development tools to administer it.
Pull vs Push
In the GitOps universe, there are two distinct operating modes: Push and Pull. These modes designate the actor who will take care of synchronizing the infrastructure with the code (what we will call the reconciliation loop ).
For example, in Push mode: Jenkins can deploy the infrastructure by calling Terraform as a system administrator would have done.
In Pull mode: it is the infrastructure that will itself look for its configuration on the Git repository. A somewhat common example would be a container that will itself download its configuration on a Git repository (yes, it is not common and not very efficient, but it corresponds well to our definition) .
These two modes have advantages and disadvantages that we will detail below.
Push Mode
Push mode is the easiest to set up and often interfaces with tools already present in the technical stack (Terraform, Puppet, Saltstack, Ansible etc.).
On the other hand, it requires that the identifiers/secrets needed to administer our technical environment are usable by the CI-CD runner or somewhere in the deployment pipeline (which can be a point of vulnerability).
Thus, the actor launching the deployment program becomes sensitive and it is appropriate to secure the supply chain as much as possible so that this machine does not reveal access.
Sweater Fashion
In Pull mode, the actor deploying the infrastructure is himself present inside it. Given its nature, he already has the access to carry out his duty: compare the Git with the technical environment and ensure that the two are in agreement.
The advantage is that Git is therefore completely clean of any sensitive data. The main drawback in this system is that it can be complex to set up and that not all environments are necessarily compatible.
The reconciliation loop
An important concept in GitOps is the reconciliation loop. This is the process that will allow you to compare the current state of the infrastructure with that described in the Git repository.
This is made up of three stages:

- Note:
- Retrieve the contents of the Git repository.
- Retrieve the infrastructure status.
- Diff:
- Compare the repository with the infrastructure.
- Act:
- Reconciling architecture with Git content.
Git in “GitOps”
With this methodology, we can still take advantage of Git to use it as it was intended: a collaborative tool. The use of Merge-Request is a real asset to allow actors to propose modifications in the main branch (the one synchronized with the infra) by allowing the “knowledgeable” to approve or reject these modifications.
By treating the configuration or architecture as code, we gain reliability and benefit from the same advantages as developers: historization, organization, collaboration.
GitOps in Kubernetes
Kubernetes is a great example of what can be done with GitOps from its most basic usage: creating and deploying YAML/JSON manifests containing the instructions that Kubernetes should apply to create an application.
It is thus possible to apply the two GitOps operating modes:
- Push – Do one
kubectl applydirectly into a Gitlab Pipeline. - Pull – A pod that regularly retrieves (via a
git pull) the contents of a repository and has sufficient permissions to apply manifests if a commit updates them.
Today, we are going to test one of the two major tools for doing GitOps: ArgoCD
When to reconcile infrastructure?
This issue is the same as during the “deployment” part of CI-CD. When should we reconcile our Git repository with our machines?
Like any good SRE, I will answer you “it depends”.
Depending on the cost of a deployment, it may be appropriate to limit interactions to deploy only major changes (or even a succession of minor modifications).
Noticed
By “cost” I am obviously talking about money, but also about potential “downtime” caused by the reconciliation loop.
A deployment at each commit can be interesting but very expensive while a deployment every night (where few users are present) can require organization to test the deployment.
So the three ways to do it are:
- Reconcile on every change in the main branch.
- Reconcile every X time.
- Reconcile manually.
Trick
It is advisable to make your commits in a side branch before merging it into the main branch to start the deployment. Thus, a commit can contain many modifications.
How ArgoCD works
ArgoCD is one of the programs that allows you to compare the contents of a cluster with that of a Git repository. It has the advantage of being simple to use and extremely flexible for teams.
What is ArgoCD?
ArgoCD is a program to compare a source of truth on Git with a Kubernetes cluster. It has many features such as:
- Automatic Drift detection (if a user has manually modified the code directly on the cluster).
- A WebUI interface for cluster administration.
- The ability to manage multiple clusters.
- A CLI to administer the ArgoCD.
- Contains a native Prometheus exporter.
- Allows you to perform pre/post reconciliation actions.
Facility
ArgoCD is a program that installs on a Kubernetes cluster, in several ways:
- A complete bundle with WebUI and CLI,
- A minimal bundle with only CRDs.
In this article, I will install a complete ArgoCD (with WebUI and CLI) on a Kubernetes cluster.
kubectl create namespace argocd
kubectl apply -n argocd -f https://raw.githubusercontent.com/argoproj/argo-cd/stable/manifests/install.yaml
To access our freshly installed ArgoCD (either via WebUI or CLI) , we need a password. This is generated automatically and stored in a Kubernetes secret.
Get the default password:
kubectl -n argocd get secret argocd-initial-admin-secret -o jsonpath="{.data.password}" | base64 -dNow you can create a proxy to access the Webui (or use a LoadBalancer/Ingress service) .
Information
If you want to expose ArgoCD service in an Ingress/HTTPRoute, you will definitely need to disable TLS:
kubectl patch configmap argocd-cmd-params-cm -n argocd --type merge --patch '{"data": {"server.insecure": "true"}}'Administer ArgoCD in CLI
Install the CLI
Apart from Pacman, the command line utility is not available in the repositories of most distributions, so it is necessary to download it manually.
curl -sSL -o argocd-linux-amd64 https://github.com/argoproj/argo-cd/releases/latest/download/argocd-linux-amd64
sudo install -m 555 argocd-linux-amd64 /usr/local/bin/argocd
rm argocd-linux-amd64
Other installation methods are available on the official documentation
Login to ArgoCD
There are several ways to connect to ArgoCD, the simplest being to connect with credentials:
- Use a password:
argocd login argocd.une-pause-cafe.fr- Using kubeconfig:
argocd login --core- Using a token:
argocd login argocd.une-pause-cafe.fr --ssoDeploy your first application with ArgoCD
We’re not going to rush things, so let’s start with what ArgoCD does best: deploying an application, nothing more, nothing less.
There are several ways to do this:
- Using the WebUI
- Using the ArgoCD CLI
- Using the CRD
Application
In this article, I will strongly favor the use of CRDs to deploy applications (or even projects) because it is the only component that will always be present with ArgoCD. The CLI and WebUI are optional and can be disabled but not the CRDs.
If you don’t know what to deploy, I offer several test applications on my Git repository: Kubernetes Coffee Image
This repository contains several applications that can be deployed in many ways: Helm, Kustomize, or even raw manifests.
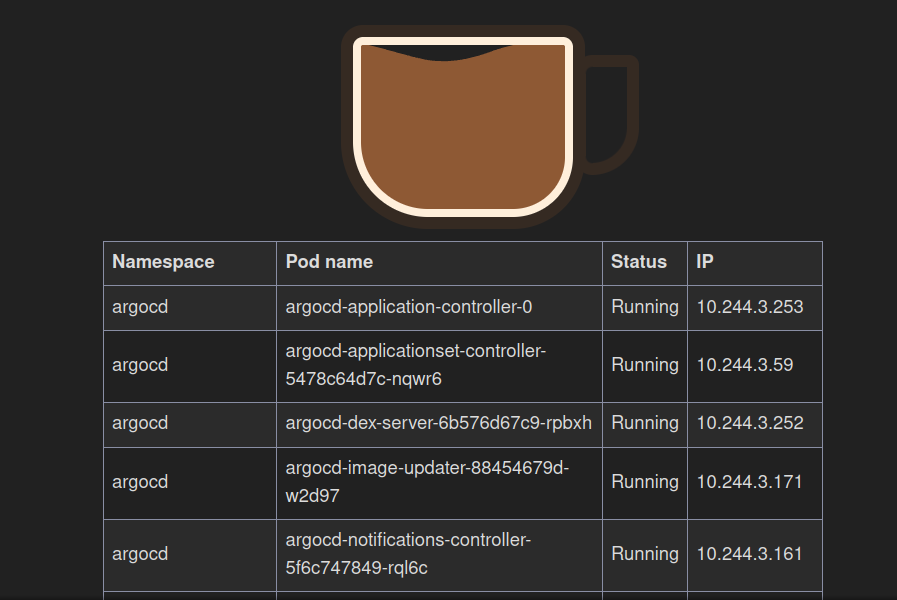
So let’s create our first application with the simplest image: time-coffeewhich simply displays an image of a coffee and the hostname of the pod.
apiVersion: argoproj.io/v1alpha1
kind: Application
metadata:
name: simple-app
namespace: argocd
spec:
destination:
namespace: simple-app
server: https://kubernetes.default.svc
project: default
source:
path: simple/chart
repoURL: https://github.com/QJoly/kubernetes-coffee-image
targetRevision: main
syncPolicy:
syncOptions:
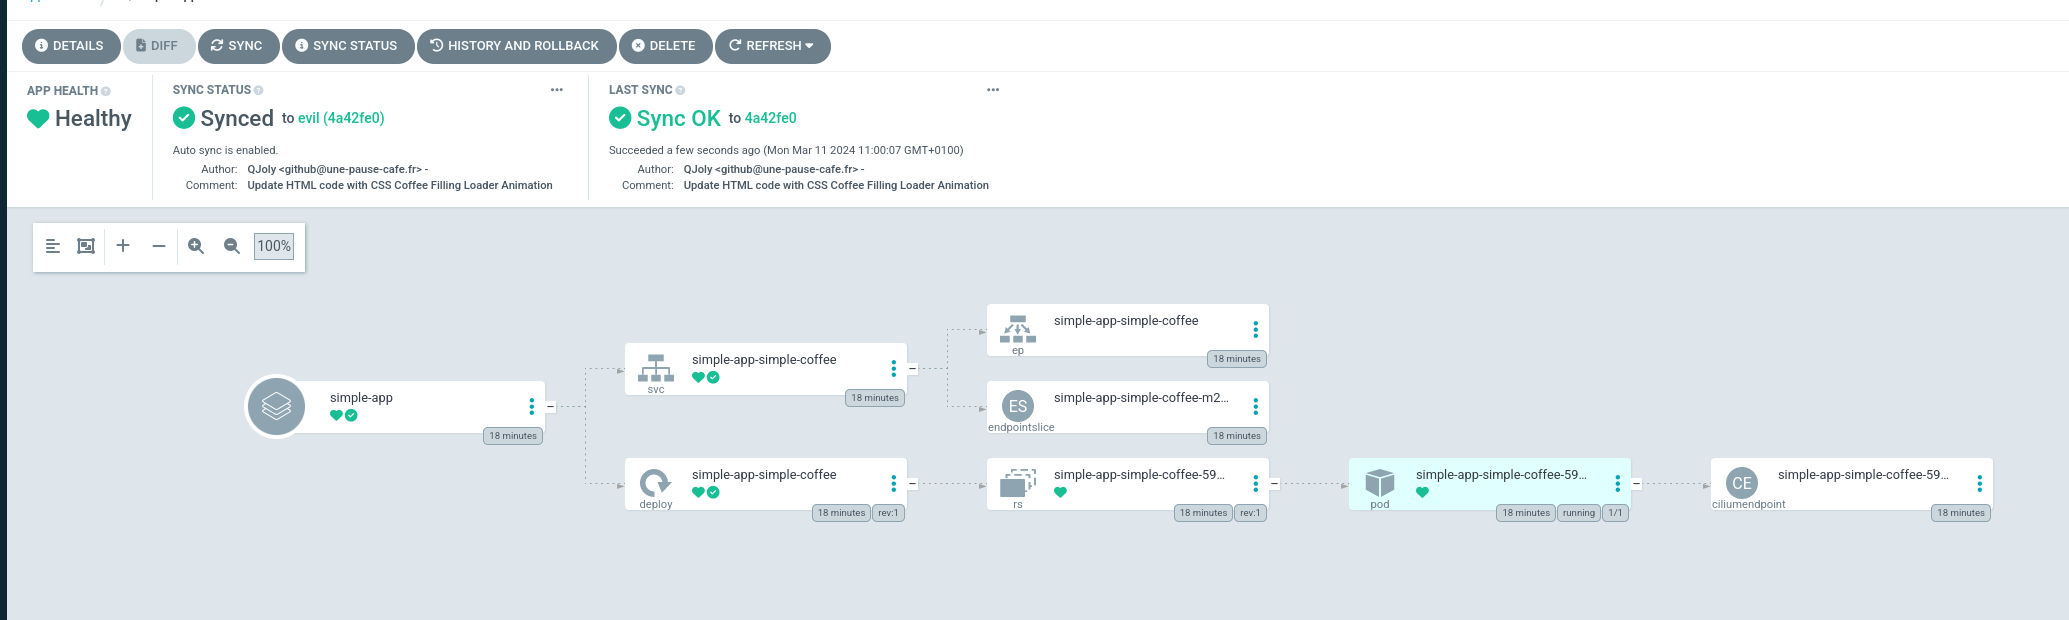
- CreateNamespace=trueWhat does this manifest do? It deploys a named application simple-appfrom the files available on the Git repository at path simple/chart.
ArgoCD does not need to be told which files to select (the folder is enough) or even the format of these files (kustomize, helm etc.). It will automatically detect the nature of these files and apply the modifications accordingly.
Returning to the ArgoCD web interface (or using the CLI), you should see your application in status OutOfSync. This means that the application is not yet deployed on the cluster.

$ argocd app list
NAME                     CLUSTER                         NAMESPACE         PROJECT  STATUS     HEALTH   SYNCPOLICY  CONDITIONS  REPO                                              PATH                 TARGET
argocd/simple-app        https://kubernetes.default.svc  simple-app        default  OutOfSync  Missing  <none>      <none>      https://github.com/QJoly/kubernetes-coffee-image  simple/chart         main
To force reconciliation (and therefore application deployment), simply click the “Sync” button in the WebUI interface or run the command argocd app sync simple-app.
After a few seconds (while Kubernetes applies the changes), the application should be deployed and its status should be Synced.
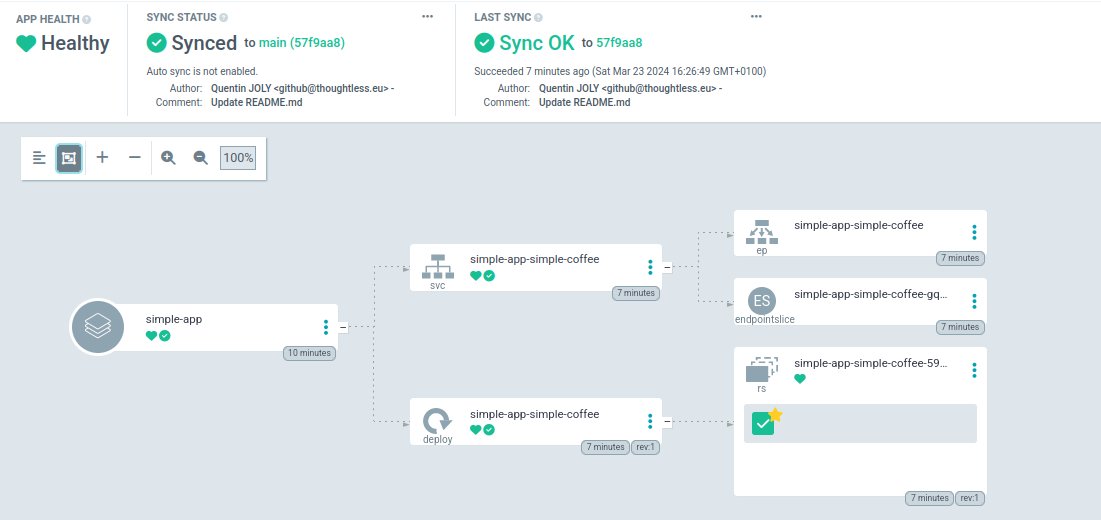
You now have the basis to deploy an application with ArgoCD.
Refresh repository every X time
By default, ArgoCD will refresh the repository contents every 3 minutes. It is possible to change this behavior to reduce the load on the cluster if ArgoCD is used for many projects (or if the cluster is heavily used).
Information
Please note that refreshing the repository does not imply reconciling the application. You will need to enable the option auto-syncfor this.
To do this, you need to set the environment variable ARGOCD_RECOCILIATION_TIMEOUTin the pod argocd-repo-server(which itself uses the variable timeout.reconciliationin the configmap argocd-cm).
$ kubectl -n argocd describe pods argocd-repo-server-58c78bd74f-jt28g | grep "RECONCILIATION"
      ARGOCD_RECONCILIATION_TIMEOUT:                                <set to the key 'timeout.reconciliation' of config map 'argocd-cm'>                                          Optional: true
Update the configmap argocd-cmto change the value of timeout.reconciliation:
kubectl -n argocd patch configmap argocd-cm -p '{"data": {"timeout.reconciliation": "3h"}}'
kubectl -n argocd rollout restart deployment argocd-repo-server
So, the Git refresh will be done every 3 hours. If automatic reconciliation is enabled and there is no synchronization window , the cluster will be reconciled every 3 hours.
Refresh the repository on each commit
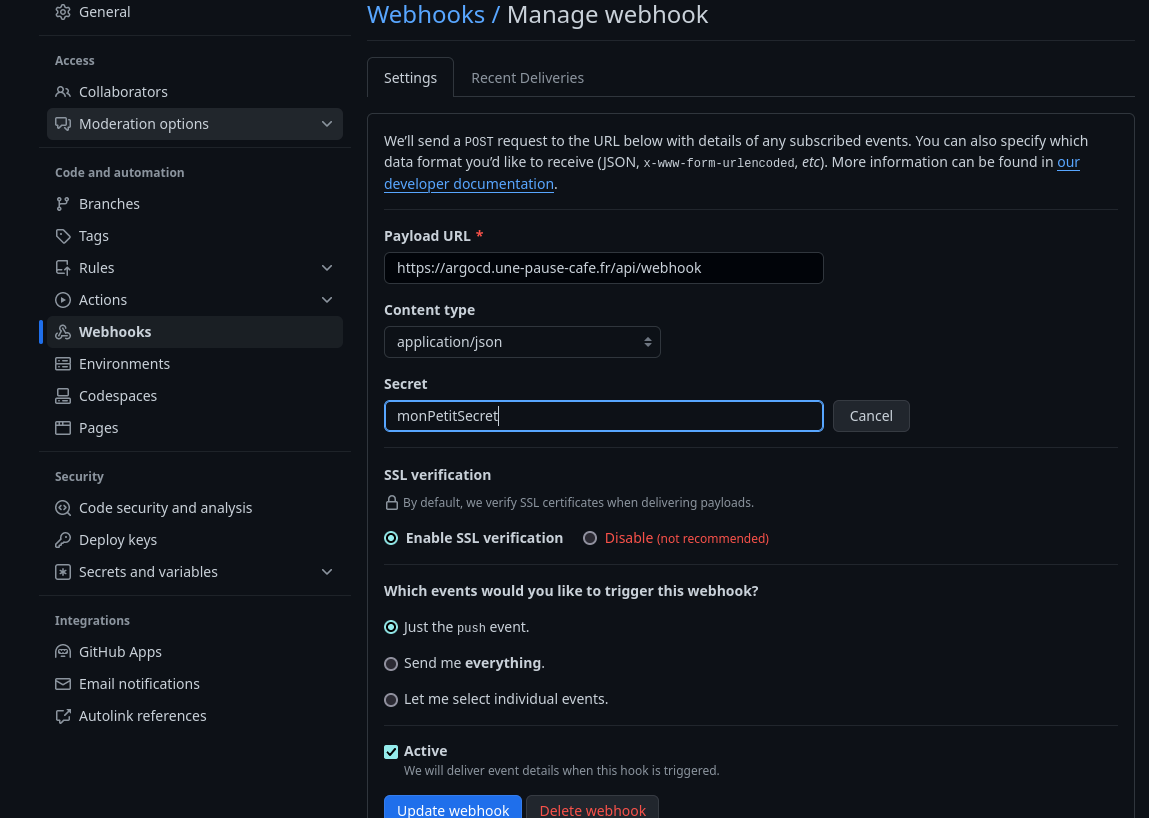
Unlike regular reconciliation, it is possible to refresh the Git automatically each time the code is modified. To do this, we use a webhook that we will configure on Github / Gitlab / Bitbucket / Gitea etc.
An optional step (but one I find essential) is to create a secret so that ArgoCD only accepts webhooks when they have this secret.
Information
Not setting this secret is tantamount to letting anyone trigger a reconciliation on the cluster and thus DoS the ArgoCD pod.
I choose the value monPetitSecretthat I will convert to Base64 (required for Kubernetes secrets) :
$ echo -n "monPetitSecret123" | base64
bW9uUGV0aXRTZWNyZXQ=
Depending on the Git server used, the key used by ArgoCD will be different:
- Github:
webhook.github.secret - Gitlab:
webhook.gitlab.secret - Gog/Gitea:
webhook.gog.secret
I use Github (so the key webhook.github.secret):
kubectl -n argocd patch cm argocd-cm -p '{"data": {"webhook.github.secret": "bW9uUGV0aXRTZWNyZXQ="}}'
kubectl rollout -n argocd restart deployment argocd-server
Then I go to my Github repository, in Settings > Webhooksand create a new webhook. I choose the type application/jsonand put the URL of my Kubernetes cluster (or LoadBalancer/Ingress service) followed by /api/webhook(for example https://argocd.moncluster.com/api/webhook).
Warning
If the ArgoCD console displays the error Webhook processing failed: HMAC verification failedwhen receiving a webhook, there may be several reasons:
- The secret is not the right one.
- The secret contains special characters that are not interpreted correctly.
- The request is not in Json.
After using a random secret, I had to change it to a simpler secret with only single characters: a-zA-Z0-9.
Synchronization Strategy
There are many settings you can set for app synchronization.
Self-Pruning
This feature is very interesting to avoid keeping unnecessary resources in the cluster. During a reconciliation, ArgoCD will delete the resources that are no longer present in the Git repository.
To enable it from the command line:
argocd app set argocd/simple-app --auto-pruneOr from the application manifest (to be put in the specapplication):
syncPolicy:
  automated:
    prune: true
Self-Heal
Self-heal is a feature that allows to automatically reconcile the cluster if a resource is manually modified. For example, if a user modifies a secret, ArgoCD will notice this difference between the cluster and the source of truth before removing this delta.
To enable it from the command line:
argocd app set argocd/simple-app --self-healOr from the application manifest (to be put in the specapplication):
syncPolicy:
  automated:
    selfHeal: true
Health Checks
When ArgoCD reconciles the cluster with the Git repository, it will display a health status for each application ( Healthy , Progressing , Degraded , Missing ). At first I didn’t worry too much about it but it might be interesting to understand what these statuses mean and how ArgoCD determines them.
For objects like secrets or configmaps, the presence of the object in the cluster is sufficient for the entity to be Healthy . For a LoadBalancer type service, ArgoCD will check that the service is exposed on the expected IP by checking if the value status.loadBalancer.ingressis not empty.
It is possible to create your own Healthchecks for objects not present in the list of objects supported by ArgoCD by creating a small Lua code in the configmap argocd-cm:
An example (available in the ArgoCD documentation) for certificates managed by cert-manager :
resource.customizations: |
  cert-manager.io/Certificate:
    health.lua: |
      hs = {}
      if obj.status ~= nil then
        if obj.status.conditions ~= nil then
          for i, condition in ipairs(obj.status.conditions) do
            if condition.type == "Ready" and condition.status == "False" then
              hs.status = "Degraded"
              hs.message = condition.message
              return hs
            end
            if condition.type == "Ready" and condition.status == "True" then
              hs.status = "Healthy"
              hs.message = condition.message
              return hs
            end
          end
        end
      end

      hs.status = "Progressing"
      hs.message = "Waiting for certificate"
      return hs
Ignore automatically created resources
As soon as I deploy a Helm Chart, Cilium will automatically create an object for me CiliumIdentityin the cluster (used to create firewall rules directly with the chart name) . This resource is not present in my Git repository and ArgoCD does not like this difference very much.
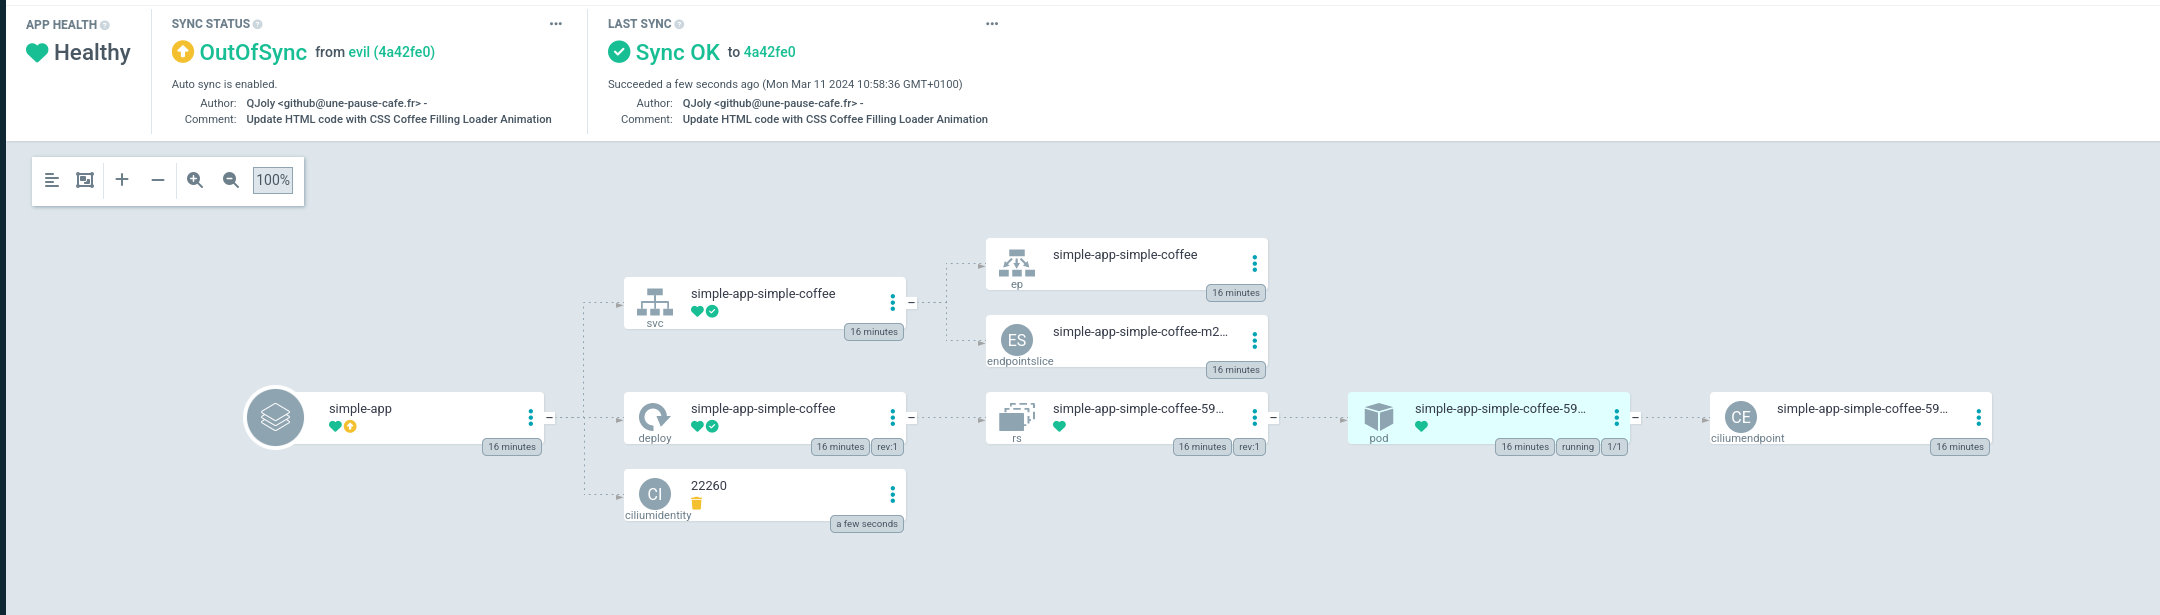
That’s why I can ask it to systematically ignore resources of a certain type. To do this, I will modify the configmap argocd-cmto add an exclusion.
resource.exclusions: |
  - apiGroups:
    - cilium.io
    kinds:
    - CiliumIdentity
    clusters:
    - "*"
After restarting ArgoCD ( kubectl -n argocd rollout restart deployment argocd-repo-server), it should no longer show this difference.
I would have liked this option to be configurable per application, but it is not currently possible to do so.
Overloading variables
A mandatory feature for most applications is the overloading of variables directly from ArgoCD. This allows you to not have to modify the Git repository to change a value and not impose the constraints of the default configuration.
There are many ways to overload variables in ArgoCD. Here is an example for Kustomize:
apiVersion: argoproj.io/v1alpha1
kind: Application
metadata:
  name: versioned-coffee
  namespace: argocd
spec:
  project: default
  source:
    repoURL: 'https://github.com/QJoly/kubernetes-coffee-image'
    path: evil-tea/kustomize
    targetRevision: evil
    kustomize:
      patches:
        - patch: |-
            - op: replace
              path: /metadata/name
              value: mon-mechant-deploy
          target:
            kind: Deployment
            name: evil-tea-deployment
  destination:
    server: 'https://kubernetes.default.svc'
    namespace: evil-ns
And on Helm:
apiVersion: argoproj.io/v1alpha1
kind: Application
metadata:
  name: versioned-coffee
  namespace: argocd
spec:
  destination:
    namespace: versioned-coffee
    server: https://kubernetes.default.svc
  project: default
  source:
    helm:
      parameters:
        - name: service.type
          value: NodePort
    path: multiversions/chart
    repoURL: https://github.com/QJoly/kubernetes-coffee-image
    targetRevision: main
  syncPolicy:
    syncOptions:
      - CreateNamespace=true
Deploy an application to multiple clusters
At the moment, we only use one cluster: the one on which ArgoCD is installed. But it is possible to deploy an application on several clusters without having to install a second ArgoCD.
To do this, it is possible to configure it easily with the command line utility (a second way is to generate several secrets forming the equivalent of a kubeconfig).
I will create a second cluster and configure it in my local file ~/.kube/config:
$ kubectl config get-contexts
CURRENT   NAME                      CLUSTER             AUTHINFO                  NAMESPACE
*         admin@homelab-talos-dev   homelab-talos-dev   admin@homelab-talos-dev   argocd
          admin@temporary-cluster   temporary-cluster   admin@temporary-cluster   default
So my cluster will be temporary-clusterand I will configure it in ArgoCD from the command argocd cluster add [nom du context]. This will create a service account on the cluster so that it can manage it remotely.
$ argocd cluster add admin@temporary-cluster
WARNING: This will create a service account `argocd-manager` on the cluster referenced by context `admin@temporary-cluster` with full cluster level privileges. Do you want to continue [y/N]? y
INFO[0017] ServiceAccount "argocd-manager" created in namespace "kube-system"
INFO[0017] ClusterRole "argocd-manager-role" created
INFO[0017] ClusterRoleBinding "argocd-manager-role-binding" created
INFO[0022] Created bearer token secret for ServiceAccount "argocd-manager"
Cluster 'https://192.168.1.97:6443' added
Returning to the WebUI interface, I can see that my second cluster is indeed present.

$ argocd cluster list
SERVER                          NAME                     VERSION  STATUS      MESSAGE  PROJECT
https://192.168.1.97:6443       admin@temporary-cluster  1.29     Successful
https://kubernetes.default.svc  in-cluster
When I add an application in ArgoCD, I can now select the cluster I want to deploy it to.
apiVersion: argoproj.io/v1alpha1
kind: Application
metadata:
  name: versioned-coffee
  namespace: argocd
spec:
  destination:
    namespace: versioned-coffee
    server: https://192.168.1.97:6443
  project: default
  source:
    helm:
      parameters:
      - name: service.type
        value: NodePort
    path: multiversions/chart
    repoURL: https://github.com/QJoly/kubernetes-coffee-image
    targetRevision: main
  syncPolicy:
    syncOptions:
    - CreateNamespace=true
The Applications Set
Applications Set is a feature of ArgoCD that allows you to create application templates. The idea is to have an application template that will be duplicated for each element of a list.
Here are some examples of use:
- Deploy the same application in multiple namespaces.
- Deploy the same application across multiple clusters.
- Deploy the same application with different values.
- Deploy multiple versions of an application.
To create an Application Set, simply create a YAML file containing the list of applications to deploy.
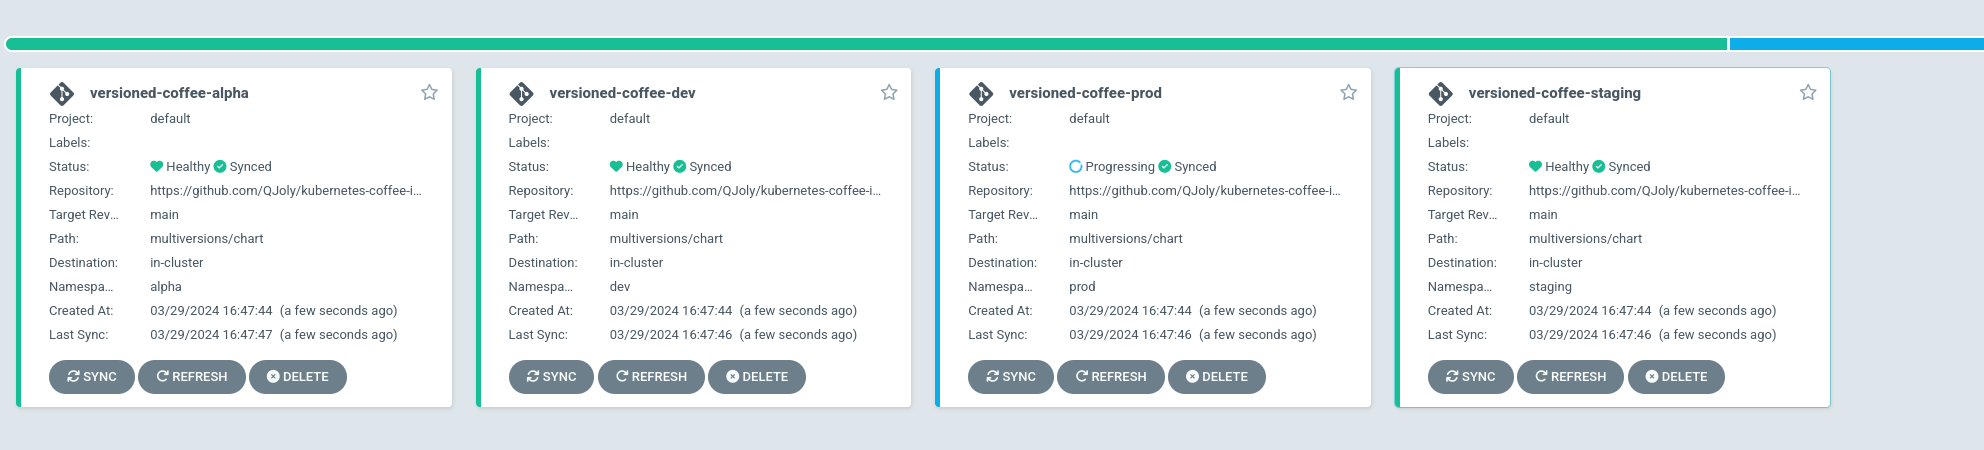
For example, if I want to deploy all versions of my application versioned-coffeein 3 different namespaces:
apiVersion: argoproj.io/v1alpha1
kind: ApplicationSet
metadata:
  name: versioned-coffee
  namespace: argocd
spec:
  generators:
  - list:
      elements:
      - namespace: alpha
        tag: v1.1
      - namespace: dev
        tag: v1.2
      - namespace: staging
        tag: v1.3
      - namespace: prod
        tag: v1.4
  template:
    metadata:
      name: versioned-coffee-{{namespace}}
    spec:
      project: default
      source:
        helm:
          parameters:
          - name: image.tag
            value: {{tag}}
        path: multiversions/chart
        repoURL: https://github.com/QJoly/kubernetes-coffee-image
        targetRevision: main
      destination:
        namespace: {{namespace}}
        server: 'https://kubernetes.default.svc'
      syncPolicy:
        automated:
          selfHeal: true
        syncOptions:
          - CreateNamespace=true
After a few seconds: I have 4 applications versioned-coffeedeployed in 4 different namespaces.
But using a static list is not the only way to create an ApplicationSet. It is possible to use external sources like ‘Generators’ to create dynamic applications:
- The list of Kubernetes clusters connected to ArgoCD.
- A folder in a Git repository (
./apps/charts/*). - All of a user/organization’s Git repositories.
- Deploy pull requests to a Git repository.
- An external API (e.g. a ticketing service).
It is also possible to couple the generators together to create more complex applications.
To deploy an application to multiple clusters, I can use the generator cluster. I can then deploy an application to all clusters, or only to the ones I want to target.
To choose all clusters, just put an empty list:
generators:
 - clusters: {}
I can also select clusters based on name:
generators:
 - clusters:
     names:
     - admin@temporary-cluster
Or a label on the secret (secret created by argocd cluster add):
# Avec un match sur le label staging
generators:
  - clusters:
      selector:
        matchLabels:
          staging: true
# Ou avec les matchExpressions
generators:
- clusters:
matchExpressions:
- key: environment
operator: In
values:
- staging
- devDuring this demonstration, I have two clusters in ArgoCD: production-cluster-v1and staging-cluster-v1.
$ kubectl config get-contexts
CURRENT   NAME                          CLUSTER                 AUTHINFO                      NAMESPACE
*         admin@core-cluster            core-cluster            admin@core-cluster            argocd
          admin@production-cluster-v1   production-cluster-v1   admin@production-cluster-v1   default
          admin@staging-cluster-v1      staging-cluster-v1      admin@staging-cluster-v1      default

$ argocd cluster list
SERVER                          NAME                         VERSION  STATUS      MESSAGE  PROJECT
https://192.168.1.98:6443       staging-cluster-v1     1.29     Successful
https://192.168.1.97:6443       production-cluster-v1  1.29     Successful
https://kubernetes.default.svc  in-cluster
I will create the applicationSet which will deploy the application simple-coffeeto the clusters whose secret contains the label app: coffee.
apiVersion: argoproj.io/v1alpha1
kind: ApplicationSet
metadata:
  name: simple-coffee
  namespace: argocd
spec:
  generators:
    - clusters:
        selector:
          matchLabels:
            app: coffee
  template:
    metadata:
      name: 'simple-coffee-{{name}}'
    spec:
      project: default
      source:
        path: multiversions/chart
        repoURL: https://github.com/QJoly/kubernetes-coffee-image
        targetRevision: main
      destination:
        namespace: simple-coffee
        server: '{{server}}'
      syncPolicy:
        automated:
          selfHeal: true
        syncOptions:
          - CreateNamespace=true
If we look at the deployed applications, we see that the application is not deployed on any cluster (because none have the label app: coffee) .
argocd app list
NAME  CLUSTER  NAMESPACE  PROJECT  STATUS  HEALTH  SYNCPOLICY  CONDITIONS  REPO  PATH  TARGET
We will add this label to the cluster secret staging-cluster-v1.
kubectl label -n argocd secrets cluster-staging-v1 "app=coffee"Instantly, the application simple-coffee-staging-cluster-v1is added to ArgoCD and deployed to the cluster staging-cluster-v1(and only to this cluster). staging-cluster-v1
$ argocd app list
NAME                                              CLUSTER                    NAMESPACE      PROJECT  STATUS  HEALTH       SYNCPOLICY  CONDITIONS  REPO                                              PATH                 TARGET
argocd/simple-coffee-staging-cluster-v1  https://192.168.1.98:6443  simple-coffee  default  Synced  Healthy  Auto        <none>      https://github.com/QJoly/kubernetes-coffee-image  multiversions/chart  main
Warning
In the manifest above, I used the variable {{name}}to retrieve the cluster name. But if it contains special characters, it will be necessary to update this name to comply with RFC 1123.
By default, when adding a cluster to ArgoCD via the command argocd cluster add, the cluster name is the context name.
For example, if my cluster name is admin@production-cluster-v1, I can rename it with the following processing:
secretName="cluster-production-v1-sc" # Nom du secret utilisé par ArgoCD pour stocker les informations du cluster
clusterName=$(kubectl get secret ${secretName} -n argocd -o jsonpath="{.data.name}" | base64 -d) # admin@production-cluster-v1
clusterName=$(echo ${clusterName} | sed 's/[^a-zA-Z0-9-]/-/g') # admin-production-cluster-v1
kubectl patch -n argocd secret ${secretName} -p '{"data":{"name": "'$(echo -n ${clusterName} | base64)'"}}'
The new cluster name will then be admin-production-cluster-v1.
If I ever want to deploy the application to the production cluster, I just need to add the label to it app: coffee:
kubectl label -n argocd secrets cluster-production-v1 "app=coffee"$ argocd app list
NAME CLUSTER NAMESPACE PROJECT STATUS HEALTH SYNCPOLICY CONDITIONS REPO PATH TARGET
argocd/simple-coffee-admin-production-cluster-v1 https://192.168.1.97:6443 simple-coffee default Synced Healthy Auto <none> https://github.com/QJoly/kubernetes-coffee-image multiversions/chart main
argocd/simple-coffee-staging-cluster-v1 https://192.168.1.98:6443 simple-coffee default Synced Healthy Auto <none> https://github.com/QJoly/kubernetes-coffee-image multiversions/chart mainAnd if I want to remove the application from the staging cluster, I remove the label:
kubectl label -n argocd secrets cluster-staging-v1-sc app-ArgoCD Image Updater
ArgoCD Image Updater is a tool to automatically update application images deployed by ArgoCD.
Why? Because every time a new image is available, the manifest would have to be modified to update it. This is a tedious task and can be automated by CI-CD or ArgoCD Image Updater .
The goal is therefore to delegate this task to ArgoCD which will regularly check if a new image is available and update it if this is the case.
This update can be done in several ways:
- By overriding manifest variables (Helm, Kustomize) in the ArgoCD application.
- By creating a commit on the Git repository for ArgoCD to take it into account (which requires having write access to the Git repository).
Other questions to consider include: “What image will we use?” and “How will I know if a new image is available?”
ArgoCD Image Updater can be configured in four different ways:
semver: For images using the semantic versioning format (1.2.3) in the tag.latest: Always use the last created image (regardless of its tag).digest: Update the image digest (keeping the same tag).name: Update the image tag using the last tag in alphabetical order (can also be coupled with a regex to ignore certain tags).
Facility
kubectl apply -n argocd -f https://raw.githubusercontent.com/argoproj-labs/argocd-image-updater/stable/manifests/install.yamlConfiguration
For this demonstration, I will rely on the method semver.
This repository has several images with semantic versioning tags : v1, v2, v3and v4. These are just PHP applications displaying one coffee for image v1, two for image v2, three for v3etc.
So let’s create an ArgoCD application using the image v1(used by default in the chart).
apiVersion: argoproj.io/v1alpha1
kind: Application
metadata:
name: versioned-coffee
namespace: argocd
spec:
destination:
namespace: versioned-coffee
server: https://kubernetes.default.svc
project: default
source:
helm:
parameters:
- name: service.type
value: NodePort
path: multiversions/chart
repoURL: https://github.com/QJoly/kubernetes-coffee-image
targetRevision: main
syncPolicy:
syncOptions:
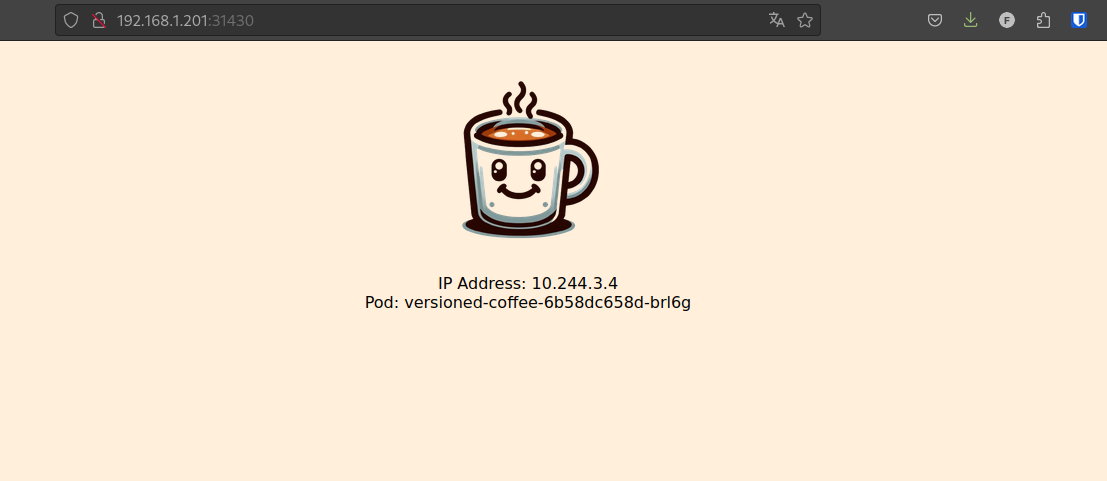
- CreateNamespace=trueBy default, my file values.yamluses the image qjoly/kubernetes-coffee-image:v1.
By opening the NodePort of our application, we can see that the image v1is correctly deployed (there is only one coffee) .
As a cluster administrator, if I learn that a new image is available, I can go and update my ArgoCD application to use a new tag corresponding to the new image.
argocd app set versioned-coffee --parameter image.tag=v2This will have the effect of overloading the variable in my Helm application image.tagfile .values.yaml
project: default
source:
  repoURL: 'https://github.com/QJoly/kubernetes-coffee-image'
  path: multiversions/chart
  targetRevision: main
  helm:
    parameters:
      - name: service.type
        value: NodePort
      - name: image.tag
        value: v2
destination:
  server: 'https://kubernetes.default.svc'
  namespace: versioned-coffee
syncPolicy:
  syncOptions:
    - CreateNamespace=true
Let’s say we are on a development platform that needs to be up to date, it quickly becomes tedious to manually update the tag each time a new version is available.
This is where ArgoCD Image Updater comes in . It can automate the act of updating image tags based on the method you choose.
We add an annotation to our ArgoCD application to tell it that it should monitor images in our repository.
kubectl -n argocd patch application versioned-coffee --type merge --patch '{"metadata":{"annotations":{"argocd-image-updater.argoproj.io/image-list":"qjoly/kubernetes-coffee-image:vx"}}}'By adding the annotation argocd-image-updater.argoproj.io/image-listwith the value qjoly/kubernetes-coffee-image:vx, I instruct ArgoCD Image Updater to monitor the images in my repository.
By default, this will automatically update the key image.tagand in my Helm application image.namefile .values.yaml
Information
If your values.yamlhas a different syntax (for example, the tag is at the app1.image.tag key, it is still possible to update this key).
argocd-image-updater.argoproj.io/image-list: coffee-image=qjoly/kubernetes-coffee-image:vx
argocd-image-updater.argoproj.io/coffee-image.helm.image-name: app1.image.name
argocd-image-updater.argoproj.io/coffee-image.helm.image-tag: app1.image.tag
On the web interface, ArgoCD tells me that the repository is Out of sync . Clicking on the Sync button updates the application tag:

You can couple this with automatic sync if needed.
Application of applications
ArgoCD allows you to deploy applications that will deploy others. It’s a bit like the principle of “composition” in programming.
Why do this? To deploy applications that have dependencies between them. For example, if I want to deploy an application that needs a database, I can deploy the database with ArgoCD and then deploy the application.
apiVersion: argoproj.io/v1alpha1
kind: Application
metadata:
  name: applications
  namespace: argocd
spec:
  destination:
    server: https://kubernetes.default.svc
  project: default
  source:
    path: argocd-applications
    repoURL: https://github.com/QJoly/kubernetes-coffee-image
    targetRevision: HEAD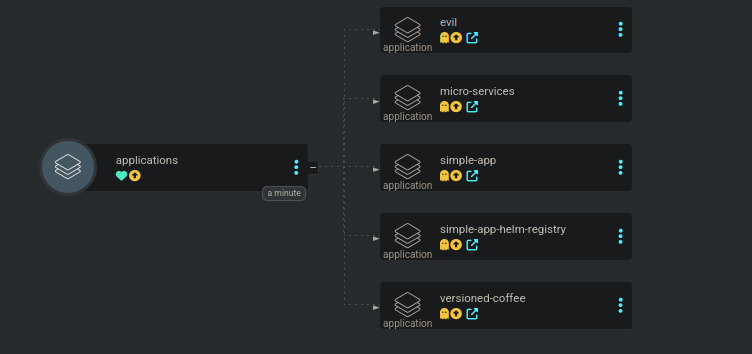
Create users
ArgoCD allows you to create users to connect to the web interface. It is possible to connect with identifiers, with a token or with an SSO.
To create a user, I have to add it directly in the configmap argocd-cm:
kubectl -n argocd patch configmap argocd-cm --patch='{"data":{"accounts.michele": "apiKey,login"}}'This command creates a user michele who can generate API tokens on his behalf and connect with a password to the ArgoCD web interface.
To assign a password to this user, I need to use the command argocd account update-password --account michele.
Now, Michèle can’t do anything on my ArgoCD, she can’t create or view applications, let’s fix that.
ArgoCD’s RBAC system works with a principle of policies that I will assign to a user or a role.
A policy can authorize an action to a user or a group. These actions can be broken down in several ways:
- Rights to a specific ‘application’ (
projet/application). - Rights to a specific ‘action’ (eg:
p, role:org-admin, logs, get, *, allow(retrieve logs from all applications)).
I will create a role guestthat will be limited to read-only on all applications in the project default.
policy.csv: |
  p, role:guest, applications, get, default/*, allow
  g, michele, role:guest
Now I want it to be able to sync the app simple-appinto the project default:
policy.csv: |
  p, role:guest, applications, get, default/*, allow
  p, michele, applications, sync, default/simple-app, allow
  g, michele, role:guest
Create a project and manage rights
A project is a group of applications to which we can assign roles and users. This allows us to manage rights more finely and limit access to certain applications.
Michèle works in the Time-Coffee project and needs rights to create and administer applications in this project.
These applications will be limited to the namespace time-coffeeof the cluster where argocd is installed and will not be able to see applications from other projects.
As an administrator, I will also limit the Git repositories that can be used on this project.
Let’s create the project first Time-Coffee:
apiVersion: argoproj.io/v1alpha1
kind: AppProject
metadata:
  name: time-coffee
  namespace: argocd
spec:
  clusterResourceWhitelist:
  - group: '*'
    kind: '*'
  destinations:
  - name: in-cluster
    namespace: '*'
    server: https://kubernetes.default.svc
  sourceNamespaces:
  - time-coffee
  sourceRepos:
  - https://github.com/QJoly/kubernetes-coffee-image
  - https://git.internal.coffee/app/time-coffee
  - https://git.internal.coffee/leonardo/projects/time-coffee
I can now create a role time-coffee-adminfor Michèle and time-coffee-developper(only in the project time-coffee).
p, role:time-coffee-admin, *, *, time-coffee/*, allow
g, michele, role:time-coffee-admin
p, role:time-coffee-developper, applications, sync, time-coffee/*, allow
p, role:time-coffee-developper, applications, get, time-coffee/*, allow
I will add the developer “Leonardo” who also works on the Time-Coffee project . He only needs to sync the apps after pushing to the Git repository.
g, leonardo, role:time-coffee-developperThe Time-Coffee project is now ready to be used by Michèle and Leonardo without them being able to access the resources of other namespaces.
…Or maybe not?
Leonardo’s password is compromised and a nasty hacker manages to connect to ArgoCD with his credentials. Luckily, the hacker can only launch a synchronization on the Time-Coffee project applications . But he manages to connect to Leonardo’s Github account and wants to hack the entire cluster to mine cryptocurrencies.
As I have authorized all types of resources: the hacker can modify the files present on the Git repository to create one ClusterRolewith administration rights on the cluster followed by a pod deploying his malware.
In this example, the ‘pirate’ application only displays pods from other namespaces. But it could have done much worse.
The error is that I allowed all resource types for the Time-Coffee project . By default, ArgoCD will intentionally block ClusterRole and ClusterRoleBinding objects to ensure project isolation.
I then remove the whitelist for cluster resources:
apiVersion: argoproj.io/v1alpha1
kind: AppProject
metadata:
  name: time-coffee
  namespace: argocd
spec:
  destinations:
  - name: in-cluster
    namespace: '*'
    server: https://kubernetes.default.svc
  sourceNamespaces:
  - time-coffee
  sourceRepos:
  - https://github.com/QJoly/kubernetes-coffee-image
  - https://git.internal.coffee/app/time-coffee
  - https://git.internal.coffee/leonardo/projects/time-coffee
Reconcile applications at a specific time
Depending on your teams’ working hours, it may be worth reconciling applications at a specific time. For example, reconciling applications at midnight to avoid disrupting users.
For this, it is possible to create a reconciliation rule in ArgoCD projects.
Information
Note that this rule applies to both automatic and manual reconciliations.
I can add the field syncWindowsin my ArgoCD project manifest to define a reconciliation window.
syncWindows:
- kind: allow # autoriser de 6h à 12h
schedule: '0 6 * * *'
duration: 6h
timeZone: 'Europe/Paris'
applications:
- 'time-coffee-*'
- kind: deny
schedule: '* * * * *'
timeZone: 'Europe/Paris'
applications:
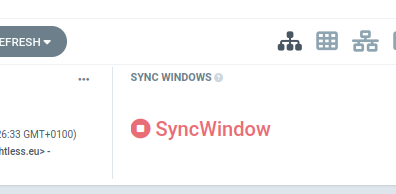
- 'time-coffee-*'From 12:00, the new ‘ Windows Sync ‘ field shows that it is not possible to reconcile the cluster with the source of truth during this period.
Noticed
It is possible to allow manual synchronizations in cases of force majeure.
You normally have to add the option manualSync: truein the window where you want to authorize it. But I didn’t succeed in my case (Bug? Config error?).
The Hooks
When given files to deploy to a cluster, ArgoCD will deploy them in a specific order. It starts with namespaces, Kubernetes resources, and finally CustomResourceDefinitions (CRDs).
The order is defined directly statically in the code
It is possible to modify this order by using the Hookswhich are themselves broken down into Phases (PreSync, Sync, PostSync, etc.) and Sync Wave (which allow you to define the order of deployment of applications with a number in the same phase).
The phases
The phases are as follows:
PreSync, before synchronization (eg: Check if conditions are met to deploy).Sync, during synchronization, this is the default phase when no phase is specified.PostSync, after synchronization (eg: Check that the deployment went well).SyncFail, following a synchronization error (eg: Rolling back the database schema).PostDelete, after removing the ArgoCD application (eg: Cleaning external resources to the application).
These phases are configured directly in the Yaml files via annotations argocd.argoproj.io/hook.
apiVersion: v1
kind: Pod
metadata:
  name: backup-db-to-s3
  annotations:
    argocd.argoproj.io/hook: PreSync
    argocd.argoproj.io/hook-delete-policy: HookSucceeded
spec:
  containers:
  - name: backup-container
    image: amazon/aws-cli
    command: ["/bin/sh"]
    args: ["-c", "aws s3 cp /data/latest.sql s3://psql-dump-coffee/backup-db.sql"]
    volumeMounts:
    - name: db-volume
      mountPath: /data
  volumes:
  - name: db-volume
    persistentVolumeClaim:
      claimName: db-psql-dump
Usually, hooks are used to launch tasks that are meant to be deleted once their work is done. To automatically delete them once they are done, it is possible to use the annotation argocd.argoproj.io/hook-delete-policy: HookSucceeded.
In order to allow time for resources in one phase to be ready before moving on to the next phase, ArgoCD leaves a 2 second wait time between each phase.
Trick
To configure this time, it is possible to modify the environment variable ARGOCD_SYNC_WAVE_DELAYin the ArgoCD pod.
The Sync Waves
During the same phase, it is possible to define an order of deployment of applications with a number in the same phase with the annotation argocd.argoproj.io/sync-wave. By default, all resources have a sync-wave of 0 and ArgoCD will start with the resources with the lowest sync-wave.
To deploy one application before another, you just need to set a lower sync-wave (eg: -1 ).
Encrypting your manifests
When writing this article, I wanted to target the lack of encryption of yaml files as the kustomize+sops combo with FluxCD would do . But during a live on CuistOps , Rémi directed me to KSOPS , a kustomize plugin that allows you to encrypt yaml files on the fly (during a kustomize build) .
Of course, solutions like SealedSecrets or Vault are preferable. My need is to be able to use Helm charts that do not accept to use ConfigMaps / Secrets external to the charts .
Unlike other alternatives, KSOPS does not require using a modified ArgoCD image to work. It is in the form of a patch to be applied to the ArgoCD application deployment to modify the container binaries argocd-repo-server.
Installing KSOPS
The first thing to do is to enable alpha plugins in kustomize and allow commands to be executed in kustomization.yaml.
To do this, you need to patch the ArgoCD application configmap to add the --enable-alpha-pluginsand arguments --enable-exec. ArgoCD retrieves these arguments from the ConfigMap argocd-cm.
kubectl patch configmap argocd-cm -n argocd --type merge --patch '{"data": {"kustomize.buildOptions": "--enable-alpha-plugins --enable-exec"}}'Then we can modify the ArgoCD application Deploymentviaduct.ai/v1 to add KSOPS and a modified kustomize (containing the kustomize plugin ) via the initContainers .
Let’s create the file patch-argocd-repo-server.yaml:
# patch-argocd-repo-server.yaml
kind: Deployment
metadata:
  name: argocd-repo-server
  namespace: argocd
spec:
  template:
    spec:
      initContainers:
        - name: install-ksops
          image: viaductoss/ksops:v4.3.1
          securityContext.runAsNonRoot: true
          command: ["/bin/sh", "-c"]
          args:
            - echo "Installing KSOPS and Kustomize...";
              mv ksops /custom-tools/;
              mv kustomize /custom-tools/kustomize ;
              echo "Done.";
          volumeMounts:
            - mountPath: /custom-tools
              name: custom-tools
        - name: import-gpg-key
          image: quay.io/argoproj/argocd:v2.10.4
          command: ["gpg", "--import","/sops-gpg/sops.asc"]
          env:
            - name: GNUPGHOME
              value: /gnupg-home/.gnupg
          volumeMounts:
            - mountPath: /sops-gpg
              name: sops-gpg
            - mountPath: /gnupg-home
              name: gnupg-home
      containers:
      - name: argocd-repo-server
        env:
          - name: XDG_CONFIG_HOME
            value: /.config
          - name: GNUPGHOME
            value: /home/argocd/.gnupg
        volumeMounts:
        - mountPath: /home/argocd/.gnupg
          name: gnupg-home
          subPath: .gnupg
        - mountPath: /usr/local/bin/ksops
          name: custom-tools
          subPath: ksops
        - mountPath: /usr/local/bin/kustomize
          name: custom-tools
          subPath: kustomize
      volumes:
      - name: custom-tools
        emptyDir: {}
      - name: gnupg-home
        emptyDir: {}
      - name: sops-gpg
        secret:
          secretName: sops-gpg
Then let’s apply the patch directly to the deployment argocd-repo-server:
kubectl patch deployment -n argocd argocd-repo-server --patch "$(cat patch-argocd-repo-server.yaml)The new version of the pod argocd-repo-servershould be stuck waiting for the GPG key.
$ kubectl describe -n argocd --selector "app.kubernetes.io/name=argocd-repo-server" pods
Events:
  Type     Reason       Age                  From               Message
  ----     ------       ----                 ----               -------
  Normal   Scheduled    10m                  default-scheduler  Successfully assigned argocd/argocd-repo-server-586779485d-kw2j6 to rpi4-02
  Warning  FailedMount  108s (x12 over 10m)  kubelet            MountVolume.SetUp failed for volume "sops-gpg" : secret "sops-gpg" not found
Create a GPG key for KSOPS
It is possible to use a GPG or Age key to encrypt our files with SOPS (the KSOPS documentation offers both cases) .
For this tutorial, I will use a GPG key. I invite you to dedicate a GPG key to KSOPS/ArgoCD for security reasons.
Warning
If you already have a key but it has a password: it will not be possible to use it with KSOPS.
I will generate a GPG key with no expiration date for the purpose of storing it in a Kubernetes secret.
export GPG_NAME="argocd-key"
export GPG_COMMENT="decrypt yaml files with argocd"

gpg --batch --full-generate-key <<EOF
%no-protection
Key-Type: 1
Key-Length: 4096
Subkey-Type: 1
Subkey-Length: 4096
Expire-Date: 0
Name-Comment: ${GPG_COMMENT}
Name-Real: ${GPG_NAME}
EOF
Now let’s retrieve the GPG key ID. If you have only one key pair in your keyring, you can retrieve it directly with the following command:
GPG_ID=$(gpg --list-secret-keys --keyid-format LONG | grep sec | awk '{print $2}' | cut -d'/' -f2) # Si vous n'avez qu'une seule paire dans le trousseau… otherwise launch the command gpg --list-secret-keysand retrieve the character string with the value “ sec ” (ex: GPG_ID=F21681FB17B40B7FFF573EF3F300795590071418).
Using the key id we just generated, we send it to the cluster as a secret.
gpg --export-secret-keys --armor "${GPG_ID}" |
kubectl create secret generic sops-gpg \
--namespace=argocd \
--from-file=sops.asc=/dev/stdin
Encrypt files
I will create a simple Deployment file that I will encrypt with KSOPS.
# deployment.yaml
apiVersion: apps/v1
kind: Deployment
metadata:
  name: simple-coffee
  labels:
    app: simple-coffee
spec:
  replicas: 1
  selector:
    matchLabels:
      app: simple-coffee
  template:
    metadata:
      labels:
        app: simple-coffee
    spec:
      containers:
      - name: nginx
        image: qjoly/kubernetes-coffee-image:simple
        ports:
        - containerPort: 80
        env:
        - name: MACHINE_COFFEE
          value: "Krups à grain"
I want to encrypt the “containers” part , I will create the file .sops.yamlto define the fields to encrypt and the key to use.
creation_rules:
  - path_regex: sealed.yaml$
    encrypted_regex: "^(containers)$"
    pgp: >-
      F21681FB17B40B7FFF573EF3F300795590071478
Next, I will ask sops to encrypt the file deployment.yamlwith the following command: sops -i -e deployment.yaml.
In the current state, our file is well encrypted but is unusable by ArgoCD which does not know how to decrypt it (nor which files can be decrypted).
For this, I will create a Kustomize file that will run ksopson deployment.yaml. This is a syntax that ArgoCD will be able to understand (it will use the binary ksopsadded by our patch) .
# secret-generator.yaml
apiVersion: viaduct.ai/v1
kind: ksops
metadata:
  name: secret-generator
  annotations:
    config.kubernetes.io/function: |
        exec:
          path: ksops
files:
  - ./deployment.yaml
The API viaduct.ai/v1is the Kustomize plugin (already present in the kustomize binary that we retrieve from the image containing KSOPS ).
I then add the file kustomization.yamlwhich indicates the nature of the file secret-generator.yamlas being a “manifest generator”.
# kustomization.yaml
apiVersion: kustomize.config.k8s.io/v1beta1
kind: Kustomization

generators:
  - ./secret-generator.yaml
By putting this in a Git repository, and giving it to ArgoCD, it will automagically decrypt the file without requiring any manual action.
I’ve published my test repository on GitHub if you want to test it yourself (you’ll need to modify the files .sops.yamland deployment.yamlto match your GPG key).
This method is a bit more complex than FluxCD(+sops), but the final need is met. I note however that it is necessary to maintain the patch to use recent ArgoCD images (init-pod import-gpg-keyand install-ksops).
Conclusion
I am very satisfied with ArgoCD and its features. It is very easy to install and configure without neglecting the needs of advanced users.
However, there is still a lot to discover around ArgoCD (Matrix generator, Dynamic Cluster Distribution, User management via SSO, etc.).
Thank you for reading this article, I hope you enjoyed it and found it useful. Please feel free to contact me if you have any questions or comments.