In Kubernetes, the concept of scaling varies based on context, generally falling into two categories:
- Cluster Scaling (Cluster Elasticity): This process involves dynamically adjusting the number of worker nodes in a cluster in response to its utilization levels.
- Application-Level Scaling (Pod Scaling): This refers to adjusting the characteristics of pods—either by scaling the number of pod replicas or the resources allocated to each—to meet demand based on various metrics. These metrics can range from low-level indicators like CPU usage to more complex ones, such as the rate of HTTP requests per second.
Pod scaling is achieved through two primary mechanisms:
- Horizontal Pod Autoscalers (HPAs): HPAs automatically adjust the quantity of pod replicas in response to observed metrics, scaling the deployment up or down as needed.
- Vertical Pod Autoscalers (VPAs): VPAs modify the resource allocation (e.g., CPU and memory) of containers within a pod to match demand, improving resource efficiency.
This post will cover cluster scaling strategies for Google Kubernetes Engine (GKE), Azure Kubernetes Service (AKS), and Amazon Elastic Kubernetes Service (EKS), followed by a discussion on implementing pod scaling using HPAs.
Scaling a Kubernetes Deployment
Use Case
You’re looking to horizontally adjust the size of your deployment.
Solution
Use the kubectl scale command for straightforward deployment scaling.
Assuming we’re working with the fancyapp deployment introduced in Recipe 4.5, set at five replicas. If it isn’t active, kick it off with kubectl apply -f fancyapp.yaml.
Imagine now the demand has slackened, and the original five replicas are no longer necessary; trimming down to three should suffice. To reduce the deployment to three replicas, execute the following steps:
First, confirm the current status of fancyapp:
$ kubectl get deploy fancyapp
Output showing five replicas:
NAME       READY   UP-TO-DATE   AVAILABLE   AGE
fancyapp   5/5     5            5           59s
Next, scale down to three replicas:
$ kubectl scale deployment fancyapp --replicas=3
deployment "fancyapp" scaled
Confirm the adjustment:
$ kubectl get deploy fancyapp
Output now showing three replicas:
NAME       READY   UP-TO-DATE   AVAILABLE   AGE
fancyapp   3/3     3            3           81s
For those leaning towards automation over manual scaling, Recipe 9.2 delves into automating this process.
Implementing Horizontal Pod Autoscaling
Use Case
You aim to dynamically adjust the number of pods within a deployment based on current demand.
Solution
Horizontal Pod Autoscaler (HPA) provides a solution, automatically scaling the number of pods in response to workload requirements.
Ensure the Kubernetes Metrics API is operational by installing the Kubernetes Metrics Server .
Step 1: Deploy an application to serve as the HPA target. Here, we use a PHP server:
$ kubectl create deployment appserver --image=registry.k8s.io/hpa-example --port 80
$ kubectl expose deployment appserver --port=80 --target-port=80
$ kubectl set resources deployment appserver -c=hpa-example --requests=cpu=200m
Step 2: Instantiate the HPA, setting the CPU utilization threshold at 40% to trigger scaling:
$ kubectl autoscale deployment appserver --cpu-percent=40 --min=1 --max=5
Monitor the HPA’s activity:
$ kubectl get hpa --watch
In a separate terminal, observe the deployment’s scaling behavior:
$ kubectl get deploy appserver --watch
Step 3: Generate load to test the autoscaling:
$ kubectl run -i -t loadgen --rm --image=busybox:1.36 --restart=Never -- \
    /bin/sh -c "while sleep 0.01; do wget -q -O- http://appserver; done"
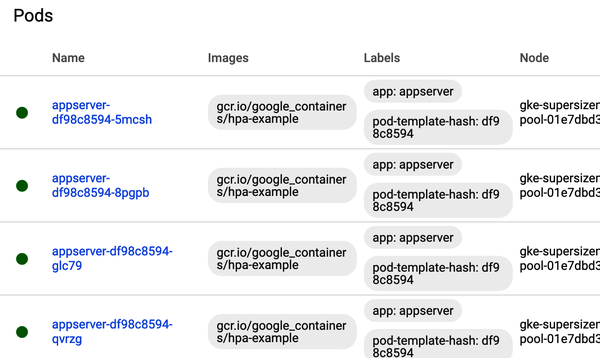
This setup involves multiple terminal sessions, providing a comprehensive view of the HPA in action.

Kubernetes dashboard, showing the effect of an HPA :
See Also:
Automating Cluster Scaling in GKE
Use Case
Problem:
You’re aiming for your Google Kubernetes Engine (GKE) cluster to dynamically adjust its number of nodes based on workload demands.
Solution
Solution:
The Cluster Autoscaler in GKE is designed for this task. Assuming you’ve got gcloud ready and your environment prepped (with a project set and billing enabled), here’s how to get your cluster to flexibly scale.
Step 1: Create an Autoscaling Cluster
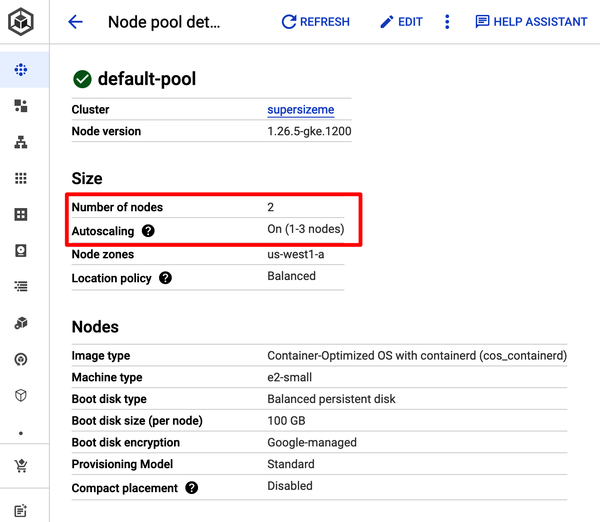
Generate a cluster named supersizeme with autoscaling enabled, starting with a single node:
$ gcloud container clusters create supersizeme --zone=us-west1-a \
--machine-type=e2-small --num-nodes=1 \
--min-nodes=1 --max-nodes=3 --enable-autoscalingCreating cluster supersizeme in us-west1-a... Cluster is being health-checked
(master is healthy)...done.
Created [https://container.googleapis.com/v1/projects/k8s-cookbook/zones/
us-west1-a/clusters/supersizeme].
To inspect the contents of your cluster, go to: https://console.cloud.google.com/
kubernetes/workload_/gcloud/us-west1-a/supersizeme?project=k8s-cookbook
kubeconfig entry generated for supersizeme.
NAME LOCATION ... MACHINE_TYPE NODE_VERSION NUM_NODES STATUS
supersizeme us-west1-a ... e2-small 1.26.5-gke.1200 1 RUNNING
After creation, your Google Cloud Console will reflect the initial setup, displaying a single-node cluster.

Step 2: Trigger Cluster Autoscaling
Deploy an application to influence cluster scaling. For example, launching three pods that require specific resources:
$ kubectl create deployment gogs --image=gogs/gogs:0.13 --replicas=3
$ kubectl set resources deployment gogs -c=gogs --requests=cpu=200m,memory=256Mi
Monitor the deployment’s status until the desired state is reached, indicating cluster autoscaling in action:
$ kubectl get deployment$ kubectl get deployment gogs
NAME READY UP-TO-DATE AVAILABLE AGE
gogs 3/3 3 3 2m27s
Subsequently, your cluster should expand to accommodate the new workload, potentially increasing to two nodes.
Discussion
To either enable or modify autoscaling for an existing GKE cluster:
$ gcloud container clusters update supersizeme --zone=us-west1-a \
    --min-nodes=1 --max-nodes=3 --enable-autoscaling
The machine type selection is crucial, depending on your applications’ resource needs. Opt for a machine type that aligns with your workload requirements to ensure efficient resource use.
Keep in mind, cluster scaling involves adding resources that may affect your cloud costs. Setting a max node limit is wise to prevent unexpected billing spikes.
To conserve resources and manage expenses, delete the cluster when it’s no longer needed:
$ gcloud container clusters delete supersizeme
See Also:
- Cluster Autoscaler documentation in the
kubernetes/autoscalerGitHub repository. - Detailed GKE documentation on Cluster Autoscaler.
Dynamically Resizing an AWS EKS Cluster
Use Case
You’re aiming for your AWS EKS cluster’s node count to automatically adjust based on current workload demands.
Solution
Leverage the Cluster Autoscaler, which integrates with AWS’s autoscaling groups to dynamically scale your EKS cluster nodes. Before proceeding, ensure you’ve installed the Helm client as per Recipe 6.1.
Step 1: Cluster Creation
Start by creating an EKS cluster named supersizeme with autoscaling configured, allowing for 1 to 3 worker nodes:
$ eksctl create cluster --name supersizeme \
    --region eu-central-1 --instance-types t3.small \
    --nodes 1 --nodes-min 1 --nodes-max 3
After creation, update your kubeconfig to ensure kubectl can interact with your new cluster:
$ aws eks update-kubeconfig --name supersizeme --region eu-central-1
Step 2: Deploy Cluster Autoscaler
Add the Cluster Autoscaler’s Helm repository and deploy the autoscaler to your cluster, substituting <YOUR AWS KEY ID> and <YOUR AWS SECRET KEY> with your actual AWS credentials:
$ helm repo add autoscaler https://kubernetes.github.io/autoscaler
$ helm install autoscaler autoscaler/cluster-autoscaler \
    --set autoDiscovery.clusterName=supersizeme \
    --set awsRegion=eu-central-1 \
    --set awsAccessKeyID=<YOUR AWS KEY ID> \
    --set awsSecretAccessKey=<YOUR AWS SECRET KEY>
Step 3: Trigger Autoscaling
Initially, the cluster will have a single node. To demonstrate autoscaling, deploy an application requiring resources that exceed the current capacity:
$ kubectl create deployment gogs --image=gogs/gogs:0.13 --replicas=5
$ kubectl set resources deployment gogs -c=gogs --requests=cpu=200m,memory=512Mi
Verification:
After the autoscaler responds to the resource requests, you’ll see an increased node count:
$ kubectl get nodes
The output should reflect the scaled-up cluster, accommodating the new workload.
Cleanup:
To prevent unnecessary charges, delete your cluster when it’s no longer needed:
$ eksctl delete cluster --name supersizeme --region eu-central-1
This approach ensures your EKS cluster remains efficiently sized for the workload it serves, optimizing both performance and cost.