Introduction
Imagine this scenario: multiple systems are running on the same K8s cluster, including important systems and less important systems. But one day, an unimportant system suddenly occupied all the resources of the K8s cluster, causing the normal operation of other systems on the cluster to be affected. This article introduces how the Kubernetes platform manages capacity, as well as my considerations and suggestions for administrators.
Kubernetes resource limits overview
We will now look at how the Kubernetes platform applies resource constraints at the container and node level. For the purposes of this discussion of right sizing, we will focus exclusively on CPU and memory, although there are other factors to consider.
Resource requests and limits can be specified for each container and Pod. Requests are guaranteed resources reserved for pods, while limits are security measures designed to protect the overall architecture of the cluster. In Kubernetes, the relationship between pod requests and limits is configured as Quality of Service (QoS). On the node, the kubelet (an agent that can monitor resources) passes this information to the container runtime, which uses kernel cgroups to apply resource constraints.
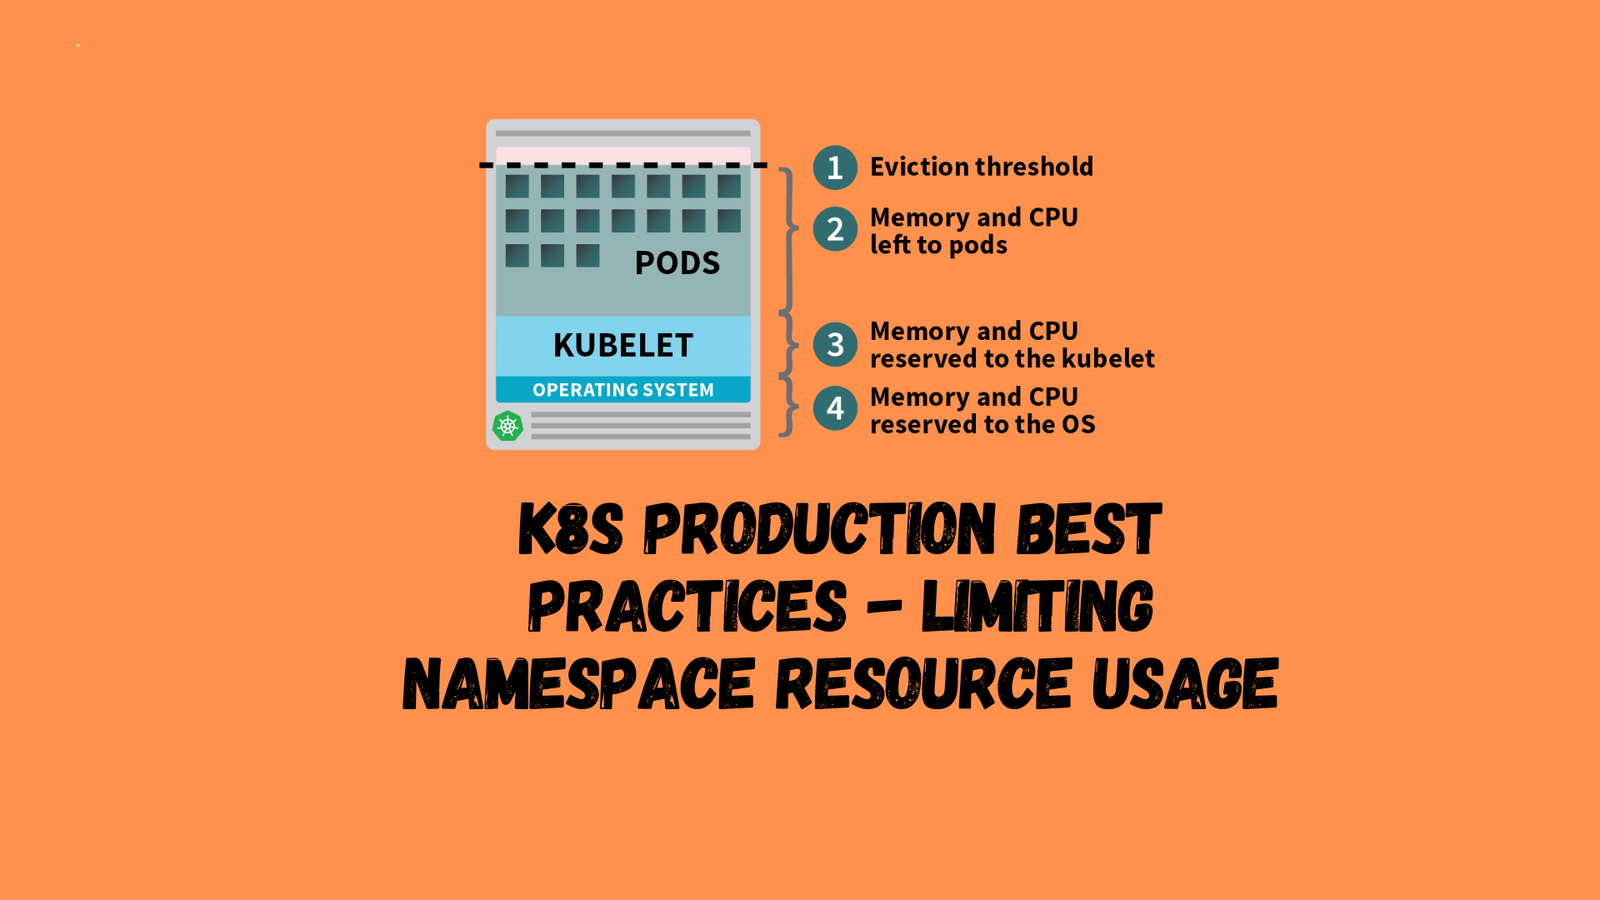
To schedule a new pod, the Kubernetes scheduler determines a valid placement on an available node, taking into account existing pod resource limits. Kubernetes preconfigures some system reservations to leave resources for use by the operating system and Kubernetes system components (see the figure below). The remaining amount is defined as allocatable, which the scheduler treats as the capacity of the node. The scheduler can schedule cells to the capacity of the node based on the aggregate resource requests of all cells. Note that the aggregate resource limits of all cells can be greater than the node capacity, a practice known as overcommitment (overprovisioning or overselling).
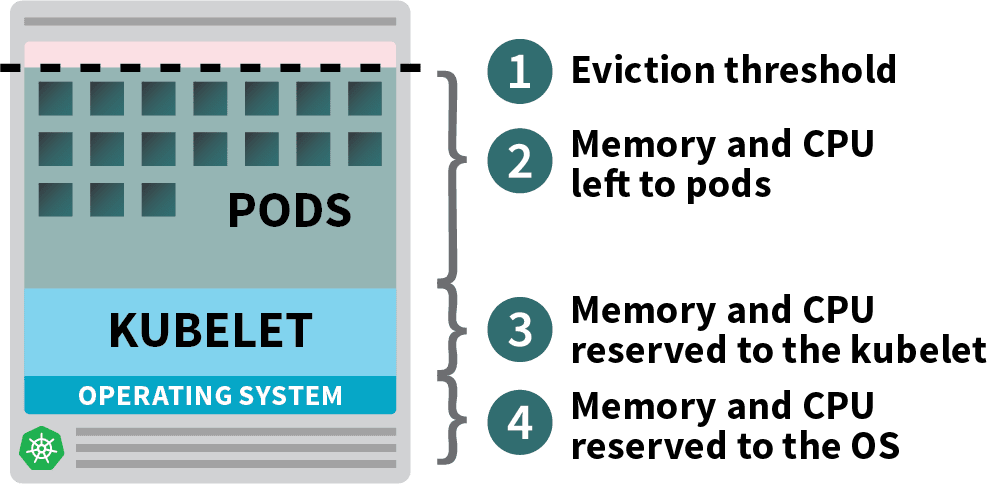
When managing node capacity, we should try to avoid two situations. In the first case, the actual memory utilization reaches capacity and the kubelet triggers node pressure eviction based on the eviction signal. If a node runs out of memory before the kubelet can reclaim it, the node oom-killer will respond by selecting pods for removal based on the oom_score_adj value calculated from each pod’s QoS. Therefore, the applications that make up these pods are affected.
The underlying mechanism for overcommitting on CPU behaves differently than memory in that it allocates CPU time to individual containers. High CPU utilization will result in CPU throttling, but will not trigger node stress evictions or automatically cause Kubernetes to terminate pods. However, please note that CPU exhaustion may still cause application pods to be degraded, liveness probes to fail, and restarts.
There’s another situation we want to avoid. At the node level, requests are guaranteed resources and must be less than capacity because the Kubernetes scheduler does not oversubscribe. If requests are significantly and consistently larger than the resources actually used, the excess capacity remains largely unused. While resources may need to be reserved for peak processing times, administrators should balance this against the recurring costs of running excess capacity that may not be needed. Configuring requests based on actual usage is a balancing act and should take into account the risk management of the application (balancing availability and cost).
What Kubernetes administrators can do
A major concern for Kubernetes administrators is managing and properly sizing cluster capacity. We can use Prometheus + Grafana dashboards on the web and the command line to capture cluster utilization metrics for administrators to use.
But Kubernetes administrators also face a big thorny issue: running applications. Applications that solve a specific problem can be written in different ways by different developers, resulting in different performance (for example, one written in Java may consume more memory, while Golang consumes relatively less memory). Every application is unique and there is no one size fits all approach. Administrators have less control over developers’ applications, and in large enterprises it may be difficult for a single management team to reach numerous development teams. Therefore, the administrator’s focus should be on setting up guardrails to allow developers (within the guardrails) to adjust their own applications.
Configuring LimitRange
After wandering around for so long, I finally got to the point.
To do this, administrators can configure different LimitRanges for each NameSpace to provide developers with recommended size limits for individual containers and pods. The following is an example of LimitRange. Since each cluster and application has different business and risk requirements, your actual application numbers will vary.
apiVersion: v1
kind: LimitRange
metadata:
  name: "resource-limits"
spec:
  limits:
  - max:
      cpu: "2"
      memory: 4Gi
    min:
      cpu: 125m
      memory: 128Mi
    type: Pod
  - default:
      cpu: "0.5"
      memory: 1Gi
    defaultRequest:
      cpu: 250m
      memory: 256Mi
    max:
      cpu: "2"
      memory: 4Gi
    maxLimitRequestRatio:
      cpu: "25"
      memory: "4"
    min:
      cpu: 125m
      memory: 128Mi
    type: Container
Good practice when developing in Kubernetes is to create microservice applications rather than large monolithic applications. To encourage the development of microservices, limits should be applied to limit the maximum size of pods. The node’s physical capacity will likely determine this maximum size, as it should easily accommodate several of the largest pods. Still similar to this picture:
Let’s continue with the LimitRange example above. Minimum pod and container sizes may be determined by the needs of the running application and should not be enforced by administrators. For simplicity, we also encourage developers to run one container per pod (a typical exception is the use of sidecar containers, such as Istio’s sidecar). Therefore, the example above uses the same resource values for both pods and containers.
Default requests and limits serve as developer recommendations. Workload resources (i.e. pods) that do not explicitly declare a container size will inherit the default value . As a good practice, developers should clearly define resource requests and limits in workload resources rather than adopting default values.
CPU and memory maxLimitRequestRatioare burst guidelines for developers. In a development environment, a high CPU maxLimitRequestRatio works well when a prototype application often runs idle but requires reasonable on-demand resources when in use. Developers may only work during business hours, coding offline in their own IDE, occasionally testing individual microservices, or testing different stages of a CI/CD pipeline. In contrast, if many end users access the application at the same time throughout the day, you will see higher baseline utilization. This might be closer to your production environment, and might lower the maxLimitRequestRatio (possibly a request limit of 1:1 in the event). Because different utilization patterns at each stage of the pipeline will result in different requests and limits, it is important to test with simulated workloads to determine the appropriate unit size before production.
Developers will use maxLimitRequestRatio as a guideline for appropriate sizing. The Kubernetes scheduler makes scheduling decisions based on resource requests, so developers should configure resource requests to reflect actual usage. Then, based on the application’s risk profile, the developer will configure limits to adhere to maxLimitRequestRatio. Administrators setting maxLimitRequestRatio to 1 forces developers to configure requests equal to the limit, which may be desirable in production to reduce risk and prioritize stability.
Earlier in this article, we compared memory and CPU and described how these two resources behave differently under load, with high memory potentially causing pod evictions or restarts from low memory situations. Therefore, it is best to err on the side of caution and configure a lower maxLimitRequestRatio for memory across different environments to prevent application pod restarts. There are other things you should be aware of when configuring memory for OpenJDK pods. The JVM heap inside the container and pod knows nothing about the container’s requests and limits (if the corresponding dynamically adjusted parameters are not configured), but resource constraints applied to the former will affect the latter.
Configuring ResourceQuota
Administrators can also configure ResourceQuotas, which provide capacity-based limits for NameSpaces to guide developers to size their applications based on forecasted estimates. Below is an example of a ResourceQuota.
apiVersion: v1
kind: ResourceQuota
metadata:
  name: compute-resources
spec:
  hard:
    limits.memory: 20Gi
    requests.cpu: "4"
    requests.memory: 20Gi
During the initial creation of an application’s NameSpace, development teams should work with administrators to predict their application size and apply appropriate quotas. Administrators should predict application size based on the number of services, replicas, and estimated size of pods. To simplify the management of many NameSpaces, administrators can consider an AWS-like approach as a starting point, where small, medium, large, and xlarge applications are given corresponding predetermined quotas.
Applications run across various stages of the CI/CD pipeline, each stage being in a different cluster or NameSpace and having its own configuration quotas. In development and testing NameSpaces where performance and high availability are not a concern, applications should be configured with minimal pods and 1 replica of the pod per service to reduce resource usage. On the other hand, in a production cluster or NameSpace, larger pods and at least 2 unit replicas per service should be used to handle higher traffic volumes and provide high availability. By using simulated workloads in a CI/CD pipeline for stress and performance testing, developers can determine the appropriate production pod size, number of replicas, and quotas before a production release.
Administrators should budget for quotas for future scaling, taking into account the application’s usage patterns, peak capacity, and configured pod or node autoscalers (if any). For example, you can allocate additional quota in a development NameSpace to quickly add new microservices, a performance testing NameSpace to determine appropriate production pod sizes, or a production NameSpace to use HPA to adjust for peak capacity. Administrators should provide adequate quota overhead for each of these and other scenarios while balancing risks to infrastructure capacity and protecting infrastructure capacity.
Both administrators and developers should expect quotas to be adjusted over time. Developers can reclaim quota without help from administrators by reviewing each service and reducing Pod requests or limits to match actual usage. If a developer has taken these steps and still requires additional quota, they should contact an administrator. Administrators should use periodic quota requests from developers as an opportunity to analyze actual consumption against previously forecasted estimates and confirm or adjust quota sizes and new forecast estimates accordingly.
In addition, some minor considerations when adjusting the quota size are introduced. Node capacity should be considered when determining quota ratios for CPU and memory so that both are utilized efficiently. For example, an AWS EC2 instance of type m5.2xlarge is 8 vCPUs, 32 GiB RAM. A cluster of m5.2xlarge nodes can use CPU and memory efficiently by allocating application quotas at a ratio of 1 vCPU per 4 GB of RAM ( regardless of the node’s system reserve ). If the application workload (i.e., CPU or memory intensive) does not match the node size, you may consider using a different node size.
There is ongoing debate among administrators about when to and not to apply CPU limits with quotas, and here we will provide some considerations rather than formal guidance. As we discussed earlier, insufficient CPU for a pod can result in throttling, but not necessarily pod termination. If an administrator prefers to overcommit and utilize all available CPU on a node, CPU limits with quotas should not be set . Instead, CPU limits with resource quotas should be set to reduce overcommitment and application performance risks , which may be a business and cost decision rather than a technical decision. Development environments can tolerate higher risks and unpredictable performance than production environments, so administrators may consider applying CPU limits to production rather than development .
Finally, in some special cases, it is not recommended to apply quotas. The purpose of applying quotas is to give administrators a certain degree of control over capacity planning for custom-developed applications. Quotas should not be applied to components of Kubernetes itself, as these projects require pre-configured amounts of resources. For similar reasons, quotas should not be applied to enterprise applications provided by third-party vendors.
Conclusion
In this article, we introduced how the Kubernetes platform protects the architecture through resource constraints, including:
- Pod requests and limits
- Node resource allocation
- NameSpace-level LimitRange for Pods and Containers
- ResourceQuota at the NameSpace level
It also provides reasonable adjustment considerations when applying limits and quota protection measures in application NameSpace. The risk appetite of each application and the capacity of the Kubernetes cluster are different and need to be considered comprehensively before implementation.
Reference Documentation
- Kubernetes instance calculator (learnk8s.io)
- Limiting Scope | Kubernetes
- Resource Quotas | Kubernetes