
Table of Contents Show
In this blog, we’ll explore how to deploy a basic Spring Boot application with a MySQL database on Kubernetes.

Prerequisites
- Kubernetes Cluster
- kubectl
- Install Docker and should have access to a Docker Hub repo
- MySQL client (Optional) – If you will log in to your MySQL database through CLI.
- Maven (3.9.6) and Java-17 installed in your system
Application Repo
Clone the Git repository given below which contains the source code to build the application.
git clone https://github.com/kubernetes-learning-projects/kube-petclinc-app.gitStep 1: Build the Java Application
Now, CD into the kube-petclinc-app directory and run the below command to build the application
mvn clean installUse the -DskipTests tag to skip the tests while building the application.
After the build is finished, you can find the application JAR file inside the kube-petclinc-app/target folder

Step 2: Build a Docker Image of the Application
To build the docker image of the application, use dockerfile inside the kube-petclinc-app directory.
FROM teckbootcamps/jre-17:1.0.0
COPY /target/*.jar /app/java.jar
EXPOSE 8080
This dockerfile uses teckbootcamps/jre-17:1.0.0 as the base image which has JRE installed in it and it copies the JAR file from the target folder and pastes it inside the docker image inside the /app folder as java.jar.
It also exposes port 8080, because the Java application runs on port 8080. Run the below command from the same directory where the dockerfile is present to build the docker image
docker build -t kube-petclinic-app:1.0.0 dockerfile .kube-petclinic-app:1.0.0 is the name and tag I have given to my docker image.
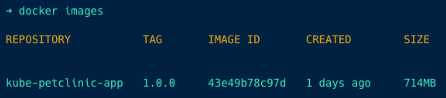
Run the docker images command to check if your docker image has been created successfully.
Step 3: Push the image to DockerHub
Before pushing the image to the DockerHub repository, you have to tag the image that you want to push, use the below to tag the image
docker tag kube-petclinic-app:1.0.0 teckbootcamps/kube-petclinic-app:1.0.0In this command kube-petclinic-app:1.0.0 is the name of the image I build and teckbootcamps/kube-petclinic-app:1.0.0 is my DockerHub repository and image tag.
Now, push the image to DockerHub using the command
docker push teckbootcamps/kube-petclinic-app:tagnameCheck if your image is pushed into DockerHub as shown below

Deploy Java Application On Kubernetes
Clone the Git repository given below which contains the YML file for the deployment.
git clone https://github.com/teckbootcamps/kubernetes-projects.gitYou can see the repository in the below structure
.
├── java-app
│   ├── configmap.yml
│   └── java.yml
├── mysql
│   ├── configmap.yml
│   └── mysql.yml
└── secret.yml
We are going to deploy the app and MySQL on two different namespaces so create two new namespaces pet-clinic-app and pet-clinic-db and follow the below steps.
Step 1: Create Secrets
CD into the 03-java-app-deployment directory and run the secret.yml in both pet-clinic-app and pet-clinic-db namespaces because the secret contains the MySQL login credentials which are needed in both MySQL and app deployment process.
apiVersion: v1
kind: Secret
metadata:
  name: mysql-cred
  namespace: pet-clinic-db
type: Opaque
data:
  username: Y3J1bmNob3Bz
  password: Y3J1bmNob3BzQDEyMzQ=
Just change the namespace and run the secret.yml file two times to create a secret in both pet-clinic-app and pet-clinic-db namespaces.
data:
  username: Y3J1bmNob3Bz
  password: Y3J1bmNob3BzQDEyMzQ=
You can see the data in the above block is given in base64-encoded values because the secret won’t be created unless you specify your username and password in base64-encoded values.
You can use the echo command with base64 to encode your data, the echo command will give the encoded values of your data. The command to encode your data is given below
echo -n '<data>' | base64For example, I set my username as crunchops, then the echo command will be
echo -n 'crunchops' | base64This command will give the encoded values of my data.

Step 2: Create ConfigMap for MySQL
CD into the 03-java-app-deployment/mysql directory and run the configmap.yml.
apiVersion: v1
kind: ConfigMap
metadata:
  name: mysql-configmap
  namespace: pet-clinic-db
data:
  init.sql: |
    CREATE USER '$MYSQL_USER'@'%' IDENTIFIED BY '$MYSQL_PASSWORD';
    GRANT ALL PRIVILEGES ON petclinic.* TO '$MYSQL_USER'@'%';
    FLUSH PRIVILEGES;

    USE petclinic;

    CREATE TABLE IF NOT EXISTS vets (
      id INT(4) UNSIGNED NOT NULL AUTO_INCREMENT PRIMARY KEY,
      first_name VARCHAR(30),
      last_name VARCHAR(30),
      INDEX(last_name)
    ) engine=InnoDB;

....... View Complete File content on the mysql/configmap.yml file ......
This creates a configmap mysql-configmap on the pet-clinic-db namespace, that contains the SQL command to create a user, password, and tables on the database, and to insert data on the table.
Run the below command to create a configmap.
kubectl apply -f confimap.ymlStep 3: Deploy MySQL Database
apiVersion: apps/v1
kind: StatefulSet
metadata:
  name: mysql
  namespace: pet-clinic-db
spec:
  serviceName: "mysql"
  replicas: 1
  selector:
    matchLabels:
      app: mysql
  template:
    metadata:
      labels:
        app: mysql
    spec:
      containers:
      - name: mysql
        image: mysql:latest
        env:
        - name: MYSQL_RANDOM_ROOT_PASSWORD
          value: "yes"
        - name: MYSQL_USER
          valueFrom:
            secretKeyRef:
              name: mysql-cred
              key: username
        - name: MYSQL_PASSWORD
          valueFrom:
            secretKeyRef:
              name: mysql-cred
              key: password
        - name: MYSQL_DATABASE
          value: petclinic
        volumeMounts:
        - name: mysql-config
          mountPath: /docker-entrypoint-initdb.d
        resources:
            requests:
              memory: "256Mi"
              cpu: "100m"
            limits:
              memory: "512Mi"
              cpu: "200m"
      volumes:
      - name: mysql-config
        configMap:
          name: mysql-configmap
---
apiVersion: v1
kind: Service
metadata:
  name: mysql-service
  namespace: pet-clinic-db
spec:
  type: NodePort
  selector:
    app: mysql
  ports:
    - protocol: TCP
      port: 3306
      targetPort: 3306
      nodePort: 30244
This file deploys a mysql statefulset database on the pet-clinic-db namespace and also a nodeport service mysql-service on the pet-clinic-db namespace so we can log in to MySQL from outside the cluster.
It mounts the data on the configmap mysql-configmap we created in the previous step as a volume mysql-config on directory /docker-entrypoint-initdb.d.
The docker-entrypoint-initdb.d directory is commonly used for running startup scripts on databases within a Docker container.
Run the below command to deploy the MySQL database.
kubectl apply -f mysql.ymlStep 4: Create ConfigMap for Java Application
CD into the 03-java-app-deployment/java-app folder and run the configmap.yml.
apiVersion: v1
kind: ConfigMap
metadata:
  name: java-app-config
  namespace: pet-clinic-app
data:
  application.properties: |
    # database init, supports mysql too
    database=mysql
    spring.datasource.url=jdbc:mysql://mysql-service.pet-clinic-db.svc.cluster.local:3306/petclinic
    spring.datasource.username=${DB_USERNAME}
    spring.datasource.password=${DB_PASSWORD}
    # SQL is written to be idempotent so this is safe
    spring.sql.init.mode=always

    # Web
    spring.thymeleaf.mode=HTML

    # JPA
    spring.jpa.properties.hibernate.dialect=org.hibernate.dialect.MySQLDialect
    spring.jpa.open-in-view=true

    # Internationalization
    spring.messages.basename=messages/messages

    # Actuator
    management.endpoints.web.exposure.include=*
    # Logging
    #logging.config=classpath:logback-spring.xml
    logging.level.org.springframework=INFO
    # logging.level.org.springframework.web=DEBUG
    # logging.level.org.springframework.context.annotation=TRACE

    # Maximum time static resources should be cached
    spring.web.resources.cache.cachecontrol.max-age=12h
Run the below command to create a configmap.
kubectl apply -f confimap.ymlThis creates a configmap java-app-config on the pet-clinic-app namespace, which contains content of the application.properties file which helps the application to connect with the MySQL database.
The username and password are given as a variable so that it can get the username and password from secret while deploying the application.
Step 5: Deploy Java Application
apiVersion: apps/v1
kind: Deployment
metadata:
  name: java-app
  namespace: pet-clinic-app
spec:
  replicas: 1
  selector:
    matchLabels:
      app: java-app
  template:
    metadata:
      labels:
        app: java-app
    spec:
      containers:
      - name: java-app-container
        image: teckbootcamps/kube-petclinic-app:1.0.0
        env:
            - name: DB_USERNAME
              valueFrom:
                  secretKeyRef:
                    name: mysql-cred
                    key: username
            - name: DB_PASSWORD
              valueFrom:
                  secretKeyRef:
                    name: mysql-cred
                    key: password
        resources:
            requests:
              memory: "256Mi"
              cpu: "100m"
            limits:
              memory: "512Mi"
              cpu: "200m"
        ports:
        - containerPort: 8080
        volumeMounts:
        - name: java-app-config
          mountPath: "/opt/config"
        command: ["java", "-jar", "/app/java.jar", "--spring.config.location=/opt/config/application.properties", "--spring.profiles.active=mysql"]

      volumes:
      - name: java-app-config
        configMap:
          name: java-app-config

---
apiVersion: v1
kind: Service
metadata:
  name: java-app-service
  namespace: pet-clinic-app
spec:
  selector:
    app: java-app
  type: NodePort
  ports:
  - protocol: TCP
    port: 8080
    targetPort: 8080
    nodePort: 30144
This file deploys the Java application java-app on the pet-clinic-app namespace and also a nodeport service java-app-service on the pet-clinic-app namespace so we can access the application on the web browser.
It gets the database username and password from the secret you created before and uses env to substitute it on the application.properties file that you created in the previous step.
The command is used to run the application JAR file along with the application.properties file so that the application can access the MySQL database.
Run the below command to deploy the MySQL database.
kubectl apply -f mysql.ymlCheck if the application is deployed properly by trying to access it on the browser, search on the browser as {node-IP:nodeport} you will get the following

Conclusion
To summarize, we built the Pet Clinic Java application using Maven, pushed it to Docker Hub, deployed it on Kubernetes using the image, and configured it with a MySQL database.
I hope this blog has been helpful in understanding how to deploy applications and configure databases on Kubernetes.


![[Solved] Couldn't get current server API group list](https://teckbootcamps.com/wp-content/uploads/2024/09/de-43-380x220.png)
![[Solved] ClusterInformation: connection is unauthorized](https://teckbootcamps.com/wp-content/uploads/2024/09/de-42-380x220.png)